Friday, January 30, 2015

Connecting Binding Ends

New! This binding technique has been further simplified! Check out Joining Quilt Binding in 3 Easy Steps - I'm sure you'll love the update!

I want to share a really easy way to connect the ends of binding that I just discovered. Previously, I used a method that required a lot of thought and attention, because of the folds and the angles. But a fellow quilter showed me this technique, and it's so simple, that it really deserves a tutorial!


Attach the binding as usual, leaving at least 15" unstitched between the two ends. It will be easier to sew the ends together with the more space you have. Fold the ends so that they meet in the middle, butting snugly up against each other, with no slack. See the arrow.


butt binding ends together


Finger press to form a crease.  Cut the bottom piece at the crease.  Do not cut the top piece yet


finger press a crease at join


Open up the bottom piece, 

open up bottom piece for matching and stitching


and line the side edge up with the fold of the top piece (arrow).

align binding edge with fold


Pin the two together, and mark a line from corner to corner.


line marked for stitching to join binding ends


Sew on the line, and check the fit before trimming.


check binding fit before trimming


Trim the diagonal seam to 1/4", and finger press open. 
Continue attaching the binding to the quilt.


binding join complete and binding stitched to quilt


Perfect!

So there you have it!  A quick, easy, binding join.
Hope you give this a try--it really is super easy! 

Want to explore more binding techniques? Check out these tutorials:
Machine Binding using glue
Piped Binding
Super Simple Binding
Two Color Binding
Matching Binding to the Piecing 
Reducing Bulky Corners
Matching Angled Binding
No Show Binding
Joining Quilt Binding in 3 Easy Steps - my all time favorite!

Happy Quilting!


Follow on Bloglovin

My Favorite Patterns

Sunday, January 25, 2015

So Long Road2CA 2015

Road2CA wrapped up today, and so did my quilting vacation. So many beautiful quilts, lots of vendors, and great classes--what more could a quilter ask for?  So sad to have it end!

I've been lucky to attend the last three years, and each time feels like a new experience.  And I'm always thrilled to learn something new!  This year was no exception.  

Wanting to try landscape quilting, I enrolled in a 3 day class with Lenore Crawford, landscape artist extraordinaire.  I brought my own picture, one we took in Santorini, Greece.
It originally had my husband standing over on the right, but I photoshopped him out.  Sorry dude!  Later, I discovered I had wasted my time because I could be choosy about what elements to leave in or take out.

This was after day one.
Very slow progress.  Finding the right fabric to portray both the color and value was the hardest part, as my small stash I brought was barely sufficient. Everyone else had these beautiful batiks, but unfortunately, that wouldn't work here.

Day 2.  The sky dilemma.  
  
In the real photo, the sky is a clear, slightly greenish blue. That color solid was not in my stash.  The piece in the above photo was borrowed from another student for consideration. After class, I was on a mission to visit all the vendors seeking my sky.  No luck.  Then I remembered I had won some fat quarters the night before, and one was a solid blue. Hopefully it would work.

Day 3.  Finishing up.
I decided to use the solid blue I had.  While not quite the depth of the real picture, I think it balances the dark at the bottom, and white of the walls.  The lighter color adds to the luminosity of the scene.  One thing I'll avoid in the future is so many white walls--really hard to find enough light fabrics for variety.  And I've never used the backs of fabrics so much!

This piece is far from finished.  There is still lots of painting to do for shading and highlighting, plus the gate, tree, railing, and window bars have to be added.  Still thinking about how to do that.

If you ever get the chance to go to Road, or any quilt show for that matter, take some classes.  I'm glad I took this one, because now I know more about the process, and it makes me want to do more!

Happy Quilting!


FTC Compliance Statement:  This blog contains affiliate links, which means I receive compensation if you make a purchase within 24 hours of clicking on the links. I only recommend products or services I use personally and believe will add value to my readers.   I am disclosing this in accordance with the Federal Trade Commission’s 16 CFR, Part 255: “Guides Concerning the Use of Endorsements and Testimonials in Advertising.”


Tuesday, January 13, 2015

Double D9P

A  Double Disappearing Nine Patch Quilt makes for another great baby quilt gift! 


Double Disappearing Nine Patch Quilt


Also known as a Double D9P, as sometimes the title can be a bit of a mouthful.

The blocks for this were leftover 9-patches from the Row by Row quilt from last summer, mainly because they were too small for that quilt.  And together, they made too small of a quilt.  To solve that problem, I made double disappearing 9-patch blocks.  No idea how to do that? Well, here's a tutorial!

Start with a 9-patch block, with darker values in the middle and corners.


nine patch block for a double disappearing nine patch quilt


Cut the block through the center, horizontally,


cut the nine patch block


and vertically, to end with this.


cut nine patch block


Spread the blocks pieces apart, and add 5 same size squares in between, with the center contrasting with the others.


adding squares to a cut nine patch block


Sew those together to make a new 9-patch block, and cut again through the center, horizontally and vertically.


cut the new nine patch block


The result is this.


cut block ready to make a double disappearing nine patch block


Rotate two opposite corners.


rotate opposing corner blocks in new nine patch block


Sew them together, and the result is a complicated looking block that's super easy to make!


double disappearing nine patch block


Sew them all together, and it becomes a Double Disappearing 9-Patch Quilt!


Double Disappearing 9-Patch Quilt


When there's a need for a quick quilt that looks super complicated, turn to a DD9P!

Happy Quilting!


Follow on Bloglovin

Saturday, January 10, 2015

Zenquilting Week 1

Last night, I parked on the couch, still recovering from the previous non-stop 'quilty' day, and just drew.  For almost two hours.


The ideas just kept flowing, and I couldn't stop!  Some of the areas I really like a lot, for example, on the left page, the combo of pebbles, stippling, and zigzags meeting up with the spiky border.  Makes an interesting background fill.

And on the other page, the area that catches my eye the most is in the upper right where the vertical lines are bounded by an echo and then horizontal lines.  There's something about that change in direction that sets that area off.

These drawings are totally random, as my goal is to draw continuous lines, such that I can then translate it to stitches. Eventually I'll experiment with predefined boundaries, but for now, I'm enjoying flow.

Here's a little bit from the beginning of the week, which started out with feathers and flowers,
just to get some ideas going.  Not that spectacular, but I got some ideas down that I can refer back to at a later time.

Then I moved into designs between two parallel lines, both in a free form flow of drawing, and the more orderly space definition.  Again, more ideas to draw upon later.


I hope that you're inspired to start drawing too.  Let me know if you want to share through a linky party!

Happy Quilting


FTC Compliance Statement:  This blog contains affiliate links, which means I receive compensation if you make a purchase within 24 hours of clicking on the links. I only recommend products or services I use personally and believe will add value to my readers.   I am disclosing this in accordance with the Federal Trade Commission’s 16 CFR, Part 255: “Guides Concerning the Use of Endorsements and Testimonials in Advertising.”

LinkConnector Validation

Tuesday, January 6, 2015

Tote Bag

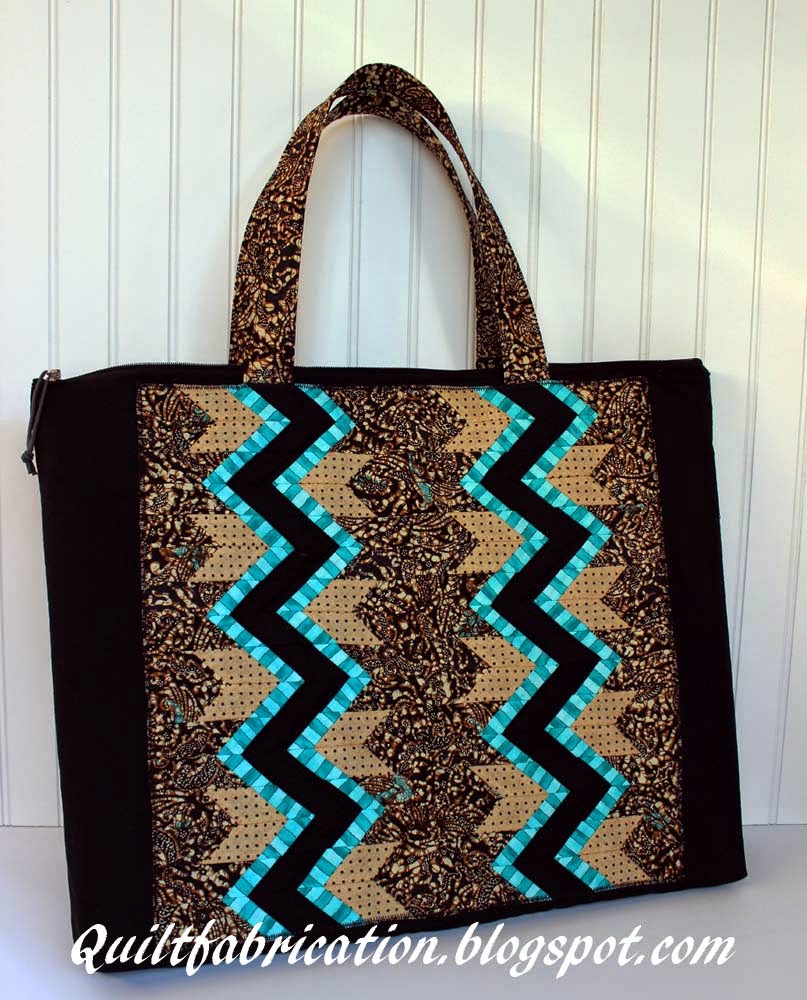
My newly covered pressing board now has a spiffy new tote bag!

I've been wanting to make one of these for a while now, because toting a board, cutting mat, and ruler to classes was always a hassle.  Now I have one, custom fit!
And an added plus, I made use of a UFO, the pieces from the class with Rita Hutchens.

The tote was pretty easy to put together, and includes a zipper at the top.  The board measures 20" x 14",
so I made the starting fabric 24" x 18", to give it a bit of room for quilt shrinkage and trimming.  Black was used on the front, the print for the lining.
A fusible interfacing was applied to all pieces for stability. The same size pieces of thin batting and a sew-in interfacing were also cut.

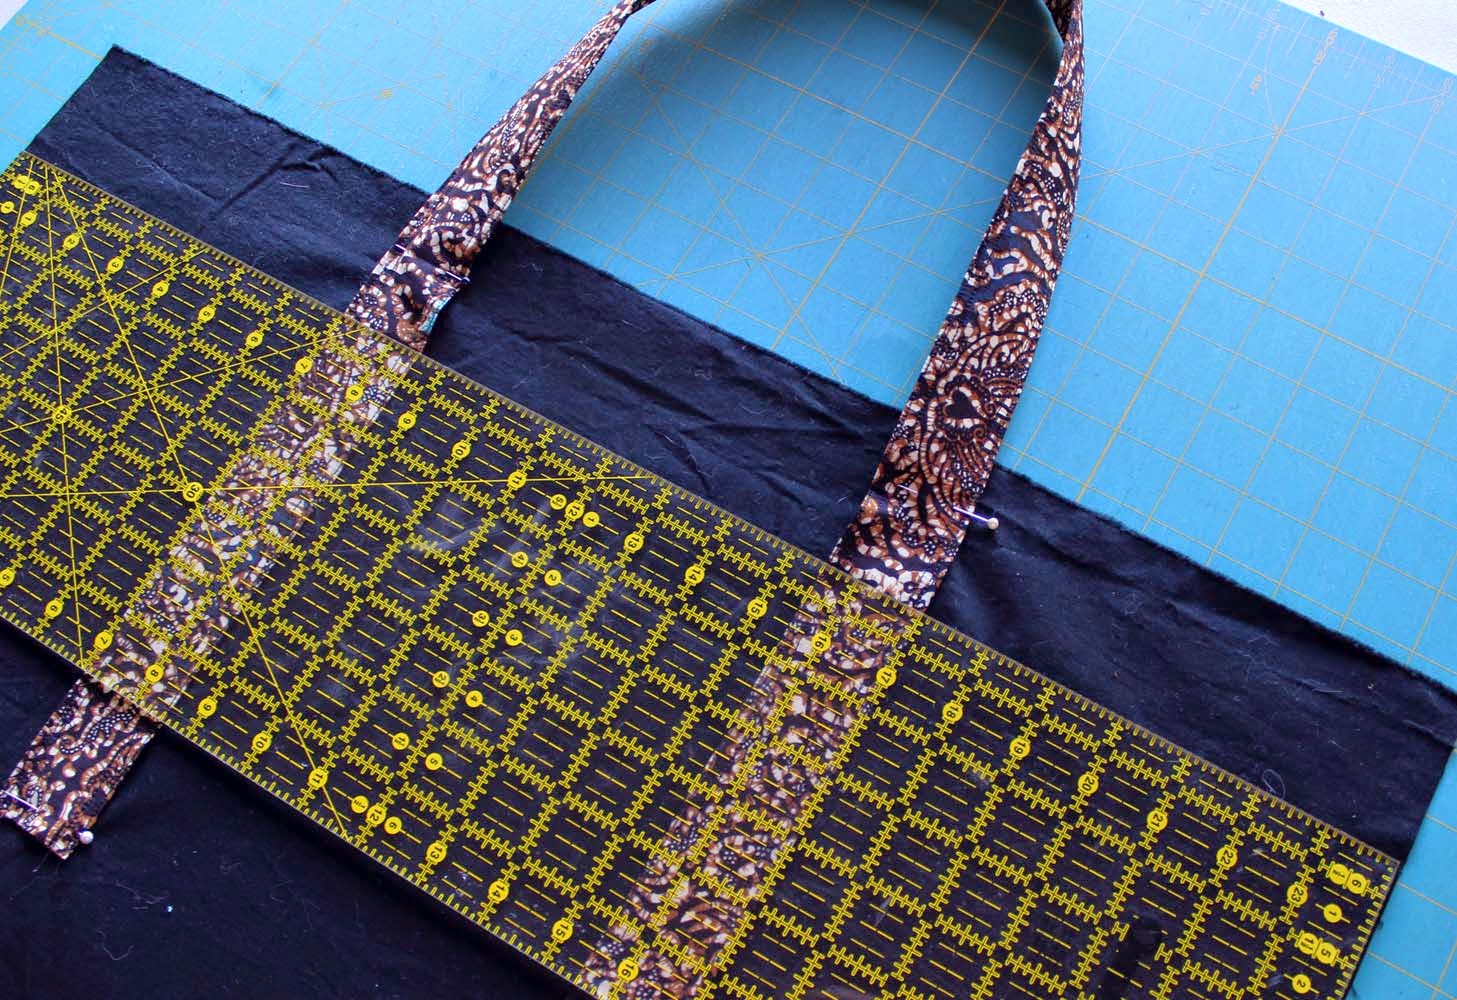
Next the straps were assembled.  These are 6" wide by WOF. The center 24" has fusible interfacing applied, then the whole strap pressed in half lengthwise.  The edges are folded to the center and pressed, making a 1 1/2" strap.  A 24" x 1 3/8" piece of batting is inserted in the center to add cushion.
They're stitched closed along each edge, then stitched again 1/4" away.

The straps get positioned on the front black piece, with the strap side edges 7" from the bag edges.  The length is determined by placing the end of the batting in the strap 1/2" below the top edge.
Straps are stitched along the edges, stopping 1/2" from the top bag edge.
This allows for application of the zipper.

Assembling a sandwich of lining (face down), interfacing, batting, and top (handles on the outside), they are stitched together at the edges.  The decorative block is placed on top of the handles, right up to where the stitching stops, so that the strap ends are hidden.  Edges are zigzaged.
Quilting was a simple 1/4" echo, and the whole process repeated for the other side.

The closed zipper is cut to 1" less than the width of top, in this case, 23", with the pull near the center.  New stops were made by pressing a 1 1/2" fabric piece just like the straps, and sewing to the ends.
The zipper is centered, pull tab side down, along the top, with the straps folded back out of the way.  Application is with a zipper foot.
This seam is flipped toward the bag, and topstitched 1/8" from the edge.
The zipper was applied to the other side in the same manner, checking that the straps line up.  The bag now looks like this.
Stitching together the three sides, right sides together, and leaving the zipper open for turning, the corners were sewn across to make a flat bottom.  Turned inside out, 
I now have a handsome carrying case for my board, cutting mat, and ruler.  Yeah!!

Happy Quilting!


Monday, January 5, 2015

Pressing Board

Do you use a pressing board?  I love mine!
What's that you ask?  It's a 3/4" or greater board that has been covered with cotton batting and a sturdy cotton fabric, to use for pressing blocks.

I have two, and use them constantly.  But one was looking a bit ugly due to all the starch scorching.  Time for a redo! 

If you would like to make one, just follow my tutorial.

Start with a board at around 20" x 14" x 3/4".  It's a size that is easy to handle, without being too heavy or bulky.  One of my boards is an old cutting board.
Cut two layers of 100% cotton batting the size of the board plus enough to go up the sides but not over to the back.  If it goes over to the back, the board doesn't sit flat.
Use a heavy cotton fabric on the top, either 100% cotton twill, or pillow ticking, like I did.  It has the added benefit of the lines!
Cut the fabric for the back so that there is at least 2" on a side. It's no problem if it's longer, like on my ends.  Using a staple gun, tack down the sides, pulling the fabric taught to the back.  Stop tacking about 4" from the end, as the space is needed for folding.
Fold the end up, parallel to the end edge,
and tuck the fabric under the stapled side, creating a fold on top.
Tack down that fold with one staple.
Do the same with other side of the corner, checking that the two top folds do NOT overlap.  The following picture is what you don't want, otherwise the board doesn't sit flat.
The corner should look like this.
Tack the other fold in place.  Repeat the steps for the adjacent corner.
Tack down all folds and edges, spacing the staples about 1"-1 1/2" apart.
Repeat for the other end, pulling the top fabric taut when folding over and stapling it.
For a clean finish, glue batting scraps to the back.
And there you have it!  An easy to handle, hard pressing surface for all your quilting needs!
Check out the custom tote bag I made for the board, a cutting mat, and ruler all in one.  

Happy Quilting!