Showing posts with label tutorial. Show all posts

Monday, March 14, 2022

Pi Day!

Happy Pi Day! I'm celebrating 3.14 with some delicious Lattice Fruit Pie Trivets and a free tutorial to make your own!

fruit fabric plus strips and ric rac make a pie

Don't these look delicious? I can't decide which is my favorite: blueberry or the mixed fruit of strawberries, raspberries, blueberries, and blackberries. Either makes for some mouth-watering trivets to pretty up the table!

Ready to make some? Then grab the following ingredients and let's make a pie!

Lattice Fruit Pie Trivet Ingredients

Makes 2 pie trivets

  • 1/4 yard fruit themed cotton prints
  • 1/4 yard insul-fleece (the one with the metal sandwiched between fleece)
  • 1/4 yard all cotton batting
  • 1/4 yard backing (I used beige, a 'crust' color)
  • 1 1/2 yard (or 1 pkg) medium or .5 inch beige ric rac
  • 1 1/2 yard (or 1 pkg) 5/8" wide beige double fold bias tape
  • 1 new, sharp, size 14 needle 


Step 1 - Cut circles

Use a circle cutting tool or an 8" plate or bowl as a template to cut the following number of circles:

2 (two) from beige backing, and insul-fleece 

4 (four) from cotton batting

1 (one) from each of the fruit prints, for a total of 2 (two) 

cutting circles with a half circle template


Step 2 - Layer the pie

Stack the cut circles in the following order to make two pies:

beige backing, cotton, insul-fleece, cotton, fruit print

BTW, I placed the exposed metal of the insul-fleece up to (hopefully) better reflect the heat back to the dish and not onto my table

batting and a fruit print in circles


Step 3 - Baste

To keep layers from shifting, use a long stitch length to baste circles together, with a line parallel on two sides, as shown next to white lines. Baste a group of 2 circles and a group of 3 circles, 
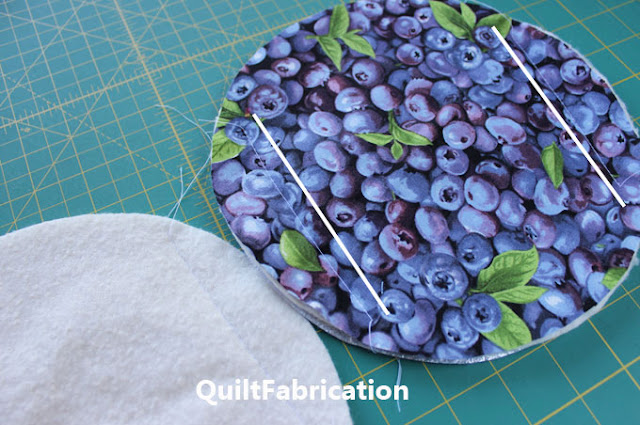
basting circles together


then baste all 5 together. Finish the basting by stitching close to the circle edge.

Remove straight line basting stitches before proceeding to Step 4.


Step 4 - Add lattice

Cut bias tape lattice strips for the center and each side, 6 (six) pieces total. Stitch in place using a zig zag stitch and thread to match the 'crust'. Trim lattice ends even with circle edge when done.

Easy lattice:

Add bias tape lattice strips in the center and on each side. Add the remaining three lattice strips perpendicular to the first set.

applying bias tape to make a lattice pie trivet

 
Woven lattice

If weaving the lattice strips, cut all six bias strip pieces, weaving them over and under each other. Start stitching with the 'under' center piece, keeping pieces that go on top folded back out of the way. Continue stitching any 'under' strips to achieve the woven effect.

weaving lattice on a pie trivet


Step 5 - Apply bias binding

Pin bias binding to the edge, overlapping and folding back final end for a nice finish. If necessary, use a bit of glue to hold binding in place.


Stitch binding with trivet backside up (fruit print face down) for even zig zag stitches along binding edge. Do not worry about catching the binding on the front of the trivet - it gets covered in the next step.


Step 6 - Apply ric rac to front

Using a longer straight stitch, around 3.5-4, stitch ric rac to the front, covering the inside binding edge and ric rac extending slightly over trivet edge. Fold back the meeting ends for a clean finish.


Step 7 - Enjoy some Pie!

Happy Quilting!


Follow on Bloglovin

My Favorite Patterns

Friday, March 11, 2022

EQ8 - Learning from the Copy/Paste Tutorial

I love Electric Quilt design software, and have used it to design numerous quilts ever since EQ6 debuted. It's a terrific software, and I'm sure I only use a fraction of it!

I'm one of those who always opens the educational emails from the Electric Quilt Company - there's usually something new to learn! A most recent email contained a very useful tutorial addressing copying and paste within the EQ8 software.

Copy and paste seems simple enough. Highlight what you want to copy, hit Control + C or Command + C to copy, then Control + V or Command + V to paste. That works fine when working within a block.

But where I have gotten hung up is copying an item in one block, then trying to paste it in a completely different block. That's my tricky part! 

Over the years, I developed a workaround to accomplish pasting into another, new block. I'd start the new block in the same block format, drawing in a random line or closed element for deletion later, just to get the new block to saveI wish I could be more specific about why I do it this way, but this workaround saves me lots of time and frustration. 

Now, I don't know if my workaround is the way to paste into a new block per EQ, but it works for me. The tutorial doesn't mention pasting into new blocks - it pastes into blocks already drawn and provides a VERY handy chart showing copy and paste functions between the different block formats (easy draw, applique, motif, etc). Take a look at this:


an easy, at-a-glance guidance for copying and pasting between different block formats. I also didn't know about converting the pasted elements to guides. That sure beats trying to get those points to snap to the drawing!

I highly recommend viewing EQ's full Copying Elements of Blocks post, where the chart can be enlarged, and detailed instructions for Easy Draw, Applique, and PolyDraw formats are shown. Electric Quilt does a terrific job of explaining their software that it would be silly of me to try to do it here. 

With the use of this chart from EQ's Copy/Paste tutorial, using the functions of EQ just got a bit clearer - I hope they are for you too!

Happy Quilting!


Follow on Bloglovin

Enjoyed this post? Don't miss out - get posts delivered directly to your inbox with follow.it.  

           
GET POSTS BY EMAIL


My Favorite Patterns

Monday, January 24, 2022

Hanging Towel Tutorial Redo

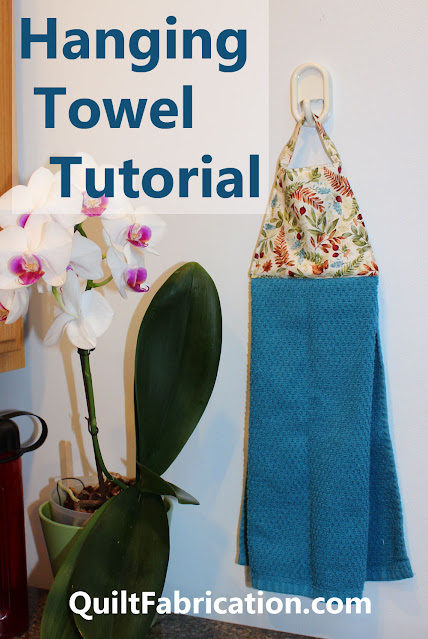
Our new home we've been working on desperately needs some hanging towels in the kitchen, a project that's right up my alley. All that's needed is a small piece of batting, a kitchen towel, and coordinating fabric plus a bit of time.

teal kitchen towel hanging from a hanger


I'm calling this a Hanging Towel Tutorial Redo as it looks similar to my original Hanging Towel design/tutorial, but it's a bit easier to put together. Let's get started on stitching these up!

Materials

As far as the material requirements, 1 (one) kitchen towel will make two hanging towels, with a coordinating fat quarter enough for both of them. Also needed is a scrap piece of batting, approximately 11" square.

Cutting, for two towels

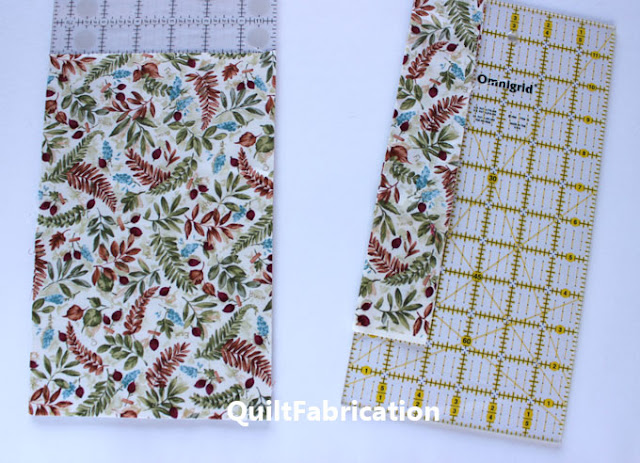
From the fat quarter, cut 1 (one) 2" wide strip and 2 (two) 10" x 6.5" rectangles.

fabric rectangle and 2 inch strip

Cut the towel in half. Fold the two edges toward the center in an accordion style, with folds meeting in the center, and edges lining up with first folds. Stitch across the top with less than a 1/4" seam allowance to hold all fold in place.


Fabric Preparation

Fold the 10" x 6.5" rectangle in half. On the folded edge, measure and pin-mark 1.5" from each side edge. Place a ruler on top, aligning the 1/2" ruler mark with the pin and the opposite corner. Trim off the small triangle.


Here's what the trim looks like without all the rulers, and with the towel basted to hold the folds.


Finish cutting the other side, keeping the pin-marks in place. Cut a piece of batting 5" x 5.25".


To the 2" strip, press it in half, then press each side to that center fold line.


Stitch along the folded line, close to the edge. Then cut 2 (two) 6" lengths.


Assembly

With the towel smooth side (not folded sides) up, stack and center the fabric and batting on top, with the fabric right side to the towel and the 5.25" batting edge running side to side. Keep the pin-marks in the fabric portion.


Stitch all pieces together, 1/4" from the towel/fabric/batting edge. Press the seam toward the hanger, then place a pin to hold the batting in place.


Flip the unit over. Trim the batting from the pin-marks in the fabric along the same angle as the sides. If the batting is too long at the fabric fold, trim the batting so that the edge is right at the fold. You can see my trimmed batting pieces in the picture.


Press a 1/4" seam allowance along the edge of the fabric piece.


Fold this piece over the batting, covering the seam. Pin in place. 


Starting 3/4" from the edge, stitch close to the folded edge.


Finger press the side seams by turning one edge over the batting and folding the other edge under to match the sides. Pin to hold edges in place.


The edges at the towel may need a bit of coaxing for a nice finish, but fortunately, there's enough fabric to turn over the seam bulk. Sorry that part is not in the best focus, but you get the idea.


Before stitching, add the hanging tie. 


I folded mine in half again, placing the ends approximately 1/2" within the seam allowance at the top fold.


Once everything is in place, start top stitching at the towel/hanger seam, where the stitching left off. Continue to the side, then up to the top making sure the hanging ties are secure, back down the other side, and around to the towel/hanger seam to finish off that 3/4 inch. Use a little less than a 1/4" seam allowance for this top stitching.


And now the hanging towel is finished and ready for use - yeah! If you make some, be sure to share on Midweek Makers.


Happy Quilting!


Follow on Bloglovin

Enjoyed this post? Don't miss out - get posts delivered directly to your inbox with follow.it.  

           
GET POSTS BY EMAIL


My Favorite Patterns

Friday, December 3, 2021

3 Extra Special Border Tutorials

Looking for a different border treatment for your project? Then look no further than these 3 ideas!


First up is the Mitered Border

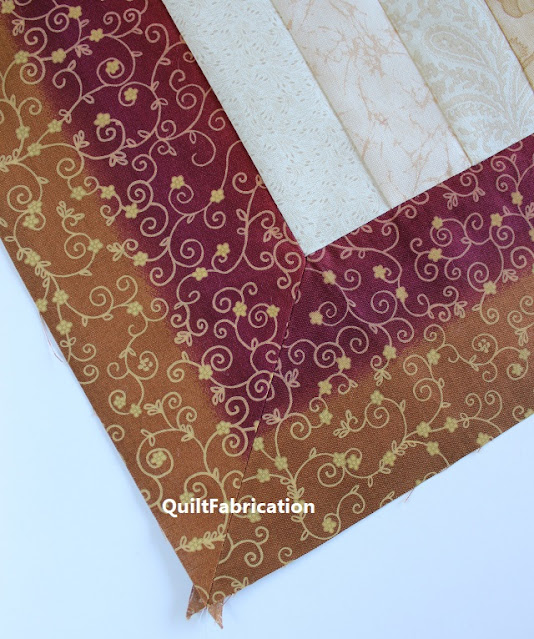
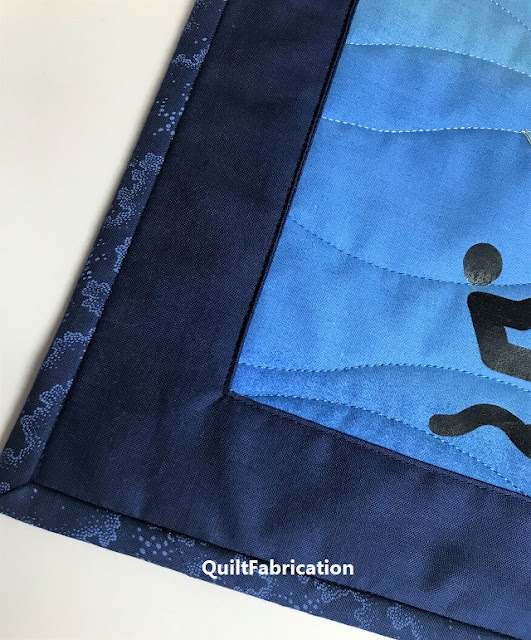
Now, some may find this border scary to create because of those 45 degree angles. But if one is careful in lining up the seams and fabric and taking test stitches, the border is really pretty simple to create. 

gold mitered quilt corner

And the impression it leaves shows that the quilter took the time and attention necessary to create a fabulous border for their quilt. Trust me - on the right quilt, mitered borders can look stunning!

For a very complete and detailed tutorial, check out my Mitered Quilt Border Tutorial and see if it makes you want to give it a try.


For smaller quilt projects, a Picture Frame Border will certainly add that extra punch!

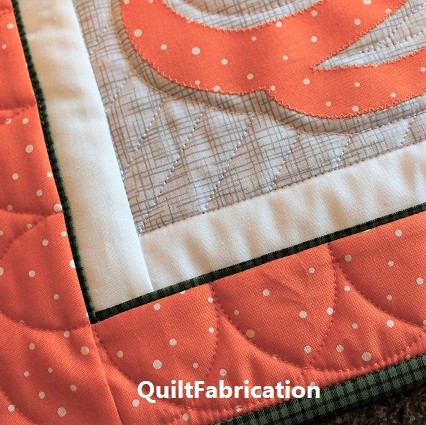
seamless border on a mini quilt

I really love the look of this border - notice there are no seams? Yet another border that's easy to do, but best kept to small projects because of the size of the fabric needed for the border.

Check out my How to Make a Picture Frame Border for all of the details and closeups. 


Last, but certainly not least, what quilt wouldn't be enhanced by adding a Decorative Flange? Here, it's a very narrow folded fabric strip that's inserted in the seam, leaving the other side free.

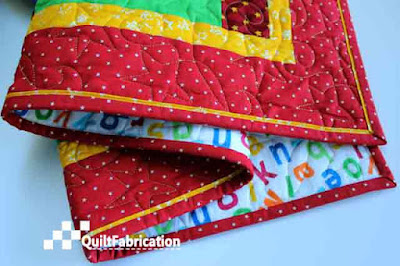
narrow green flange in a quilt border


For maximum impact, this flange looks impressive when it's kept super narrow. Simple to do but making a really big impact! Check out what I mean with my Inserting a Decorative Flange tutorial. It's just as impressive as Piped Binding, though easier and in a different area of the border.

narrow yellow flange next to quilt binding

So the next time your adding borders to a quilt and want something a bit extra, consider using one of these techniques. I'm sure your quilt will be extra stunning!

Happy Quilting!


Follow on Bloglovin

Enjoyed this post? Don't miss out - get posts delivered directly to your inbox with follow.it.  

           
GET POSTS BY EMAIL


My Favorite Patterns

Friday, June 18, 2021

Die Cutting Hints and Tricks

Today I'm sharing a few hints and tricks that I've learned in die cutting, using the Crossover II machine from Crafters Edge

die cut white star

I had the machine and several dies for a few months now, enjoying the system for cutting accurate shapes. That star seen above was certainly quick and easy!

As a newbie, here's a few things I've learned about die cutting which I hope will help you when you get your machine.


1. Apply fusible to the fabric first

I've made three projects that require fusing, and on each and every one, I forgot to apply the fusible before cutting. You'd think I'd have learned after the first or even second time!

My excuse for the first omission is the excitement over cutting with a new quilting gadget. How fun to make a fabric/die sandwich, wind it through the rollers, and pop out a perfectly cut shape on the other side! 

Sounds silly I know, but I'm one of those who finds joy in the simplest of things. Which makes it totally understandable as to why I forgot the fusible.

To rectify my problem, it seems easy enough to just cut the fusible with the die. 

die cutting two nested stars


It's great that the star sizes nested, leaving just enough fusible for a wide star outline. That way I don't have one big fused and stiff star. And it looks like it cut great, right?

die cut star from fusible web


Well, sort of. I wouldn't say that it was cut all the way through as I had to use the scissor to get it free. Either it's the nature of fusible web, or I just needed more pressure from the rollers - at this point it was close enough.

Ultimately though, I had a nice star outline which fit perfectly onto my fabric star. Problem solved - this time.

die cut star outline


2. Do not stack fusible sheets then cut them with the die machine 

This was snafu #2. Once again, I'd forgotten to put the fusible on several circles I was cutting. Being the queen of efficiency, stacking and cutting fusible web, seemed like a great idea. Just look at all those layers the arrow is pointing to - one cut and done!

layers of fusible web for die cutting


Turns out that the pressure the rollers pressed all of the fusible layers together, making it a painstakingly slow process to get the layers apart. I was lucky if I got them apart in a complete piece.

So much for that idea, which goes back to the first point - apply fusible first.


3. Do not die cut batting

Unless you want felt, the pressure from the rollers will crush any poof in that batting. 'Nuff said.


4. Use tape for fussy cutting

Notice in the picture above I'm using two circles, which will cut out a ring and an inner circle. When the ring has to be perfect all around, use a piece of tape to hold the two dies in place. The tape is hard to see, but it's in that black circle.

fussy cut circles


I used this technique when cutting out a window frame,

tape holding circle dies in place


to fuse to my beach house.

pink beach house with circle window


5. Adjust the roller pressure or remove a fabric layer

One piece of fabric needs different pressure (usually less) than several layers. Too much, and you'll find the sheet metal piece getting deep groves in it, not to mention how much harder it is to crank the sandwich through the rollers.

And there's also the fabric thickness too consider. The pressure that had been working well for a stack of five fabrics may need adjustment with a new stack due to either thinner or heavier fabric.

I found that out when cutting the leopard prints for Sheba. One or two fabrics were thick, making the first cut unsuccessful. Removing a fabric layer helped more than changing the pressure. And the die was easy to replace in the same spot as usually there were heavy indents in the fabric that the die fell back into. Not all was lost!

fabric on a tray for die cutting


5. Place the die at a slight angle with the rollers

The whole die sandwich has an easier time going through if the die is at a bit of an angle to the rollers. It gives those rollers a chance to gradually move along the die edge versus butting right up against it, like hitting a speed bump.

fabric ready for die cutting


6. Support long strips

There are times when it makes for better fabric usage to cut from a long strip. I did this when cutting triangles, turning the die for each cut to conserve fabric. Just be sure that the bulk of the strip is supported off the cutting surface. Otherwise, it wants to slide off. The strip in the photo is on the short side, but you'll understand the point when there's a 15-20 inch tail.

fabric strip ready for die cutting


Phew! I've reached the end of my list of what I've learned so far about using a die cutting machine, and I hope you find this useful. I'll admit I'm having a lot of fun creating projects from the various Crafters Edge dies, so be prepared to see more in the next few months.

Happy Quilting!


Follow on Bloglovin

Enjoyed this post? Don't miss out - get posts delivered directly to your inbox with follow.it.  

           
GET POSTS BY EMAIL


My Favorite Patterns