

First, a little background:
Over the last two weeks, the sewing machine has been humming away, making several large lap quilts for those in Paradise, CA.
Using the 'Quarter Cut' pattern I dreamed up, I've now made three of these quilts,

PARADISE 1
PARADISE 4

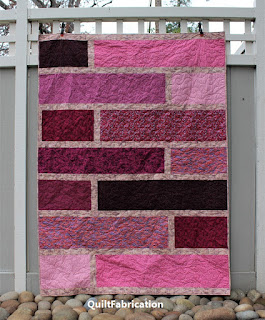
QUARTER CUT 3
because they are fast and easy to put together, AND they are a fantastic stash buster!
Having now come up for air, I can share how the Quarter Cut quilt is put together using quarter or third yard x WOF pieces, fat quarters, and yardage for sashing - woohoo!
Now, this is not one of those 'cut a specific size' types of pattern. It requires a bit of free-form piecing, based upon the size of yardage pieces used. The only measured cut is the sashing, at 2 1/2" x WOF.
The final quilt measures around 60" x 72", give or take a few inches, as it all depends on the sizes of the fabric pieces.

To make it a bit longer, add two more sashing strips, top and bottom,

just as I did for Paradise 4.

The Quarter Cut quilt uses fabric pieces that are 8" - 11" wide x WOF (width of fabric) in length. It's a great stash buster, especially for those "what do I do with this" pieces of fabric. Just choose a group of themed fabrics, like florals, animal prints, homespuns, food, winter, leaves, patriotic, etc, - anything with the theme that will tie this quilt together. Below is Paradise 1, with floral prints that all have some blue in them.

Or choose fabrics that coordinate with the backing, like Paradise 4.

As for quantities, 7 (seven) quarter or third yard (8" - 11") x WOF pieces, plus up to 7 (seven) fat quarters (depends on how much variety you want), and around a yard for sashing are the general guidelines. Some pieces may be narrower or wider than 9", and there are no hard and fast rules for widths. Essentially, use what you've got!
Quarter Cut Quilt Tutorial
Step 1 - Layout
This is the design stage, to see if there's enough themed fabric for the top, and to get an idea of what will go where. Don't cut any fabric at this time - just take note of how much there is of any one piece, so that any remaining can be used in another spot.
Start the layout with any yardage that can have two or three rows cut from it - this will add continuity to the quilt. Below, I had a red one-yard piece which made three staggered rows, forming the base of my quilt.

Place the top row to the left side, and work down from there, adding and staggering rows, sides to side. Place three rows of the same or similar fabric in row 1, 4, and 7 (see the red above). These positions make it so the print doesn't dominate in any one area, such as one side or the top or bottom.
If there are two pieces of the same or similar fabric, stagger them to opposite sides of the quilt - there will always be two rows in between them. See rows 2 and 5. If there's another set of two, place those in rows 3 and 6, otherwise fill those rows with remaining yardage.
Step 2 - Fill out the Layout
Next, add in the fat quarter cuts. Try to use the long 20"+ edge in the row, to make the quilt as wide as possible.

Evenly distribute the lights and darks, and try not to place the same print above or below. In the picture above, the fat quarters in row 1 and 4 are the same, nicely staggered in the top. Also, row 3 and 6 are the same, and eventually row 2, once I cut the that fat quarter for the other half.
When it's a pleasing arrangement, it's time to cut and sew!
Step 3 - Cutting and Sewing
Grab the sashing fabric, and cut several 2 1/2" x WOF strips to get started. Then pick a row - just remember which side the fat quarter goes on!
I chose to start with row 5, because it has a fat quarter piece already cut - that row will be the width of that cut fat quarter.

Assembling the row
Stitch a 2 1/2" sashing piece in between the pieces for the row, lining up the top edges and with the smaller, fat quarter piece on the right for row 5.
Fold the long piece to the sashing edge, then fold the short piece on top, lining up that top edge.

Then trim off the excess and the extra sashing. Add another 2 1/2" x WOF sashing strip to the shorter, cut off sashing piece, and use that for sashing along the bottom.

Because of the different WOF's, I can't tell you how long to cut the sashing. Just be gentle - no stretching, pulling, or making waves. Let the fabrics naturally rest together before going under the presser foot. Trim off the excess sashing.

Now, sometimes there will be a row in which both pieces need to be cut to size, approximately 9". Start by cutting the fat quarter in half first, making approximately two 9" x 20" pieces. Then cut the longer piece to match that width, or stitch the pieces together and trim like I did above. Keep in mind, fabric cuts can be wonky, making for different sized pieces. Work with what's given, and try not to make a row that's below 8" wide. Conversely, try not to make a row that's greater than 11" wide. This quilt looks better with a slight variation in row width, but not wide swings.
Continue these steps for each row, adding sashing to the bottom of all but the last row,

and placing all rows back on the design wall.

Step 4 - Final Layout
Notice in the picture above, some rows are longer than others. In this particular quilt, most of them are the same length, with a couple rows longer. This allows for a bit more creativity in the layout, as those long rows can be shifted left or right, allowing the vertical sashing strips to stagger up and down the quilt. Of course, having them in line is an option too - it's really your choice!
Using a long measuring tape, check the width and length of the top. What if there's a row that's much shorter than the others? I certainly wouldn't want to trim away extra width to accommodate one row.

Well, the solution is simple - add a sashing strip at the quilt edge and the problem is solved, as shown on Paradise 4.

What about the length? Does it need to be a few inches longer? Then add two extra sashing pieces at the top and bottom to provide extra length, again as shown on Paradise 4 above.
Once the final layout is determined, with extra sashing or no, the rows are sewn together in pairs, then the pairs are sewn. This helps keep track of the row order and which edges line up.

The quilt is now ready for trimming and to be squared up.
Step 5 - Trimming
To trim off the excess on the row ends, fold the quilt in half, bottom to top. Adjust along those edges to make for a smooth fold. Fold it in half again, lining up the fold with the cut edges of the top and bottom. Smooth it out on the cutting surface, and line up a ruler with the top and bottom folds. Flip through all four layers to find the shortest row, and trim to that row.

And within a few hours, the Quarter Cut quilt is ready for quilting - wasn't that fast and easy???
I hope you've enjoyed this quick stash-busting quilt tutorial. Send me a picture if you make a Quarter Cut quilt - everyone would love to see!
Happy Quilting!


My Favorite Patterns
Hi Susan! I have been meaning to say how nice your quilts are turning out for the folks in Paradise. Thank you for the tutorial! It is always nice to have a quick pattern available for a quilt, and it also features the fabric nicely too. Plus those 2.5" sashing strips could very easily be some leftover jelly roll pieces. Happy Friday to you! ~smile~ Roseanne
ReplyDeleteThanks Roseanne! And you're very welcome for the tutorial - send me a pic if you make one.
DeleteThanks for another great tutorial. AND thank you for continuing to blog. You are a definite asset to the quilting world.
ReplyDeleteMerry Christmas
xx, Carol
Thank you so much for the very kind words - you've made my day!
DeleteThank you Susan, I am hoping to make at least one of these this winter. I too have lots of homespun and that very same beige fabric for the sashing!
ReplyDeleteYou're very welcome - send me a picture when you get one done! This pattern is addictive!
DeleteSimple is good, and using up stash is perfect! Thanks for the instructions.
ReplyDeleteYou are very welcome Barb!
DeleteGreat tutorial; thanks for pausing in making these quilts to share how you are putting them together with us!
ReplyDeleteThank you and you're welcome! This quilt pattern is addictive, not only for it's quick assembly, but for using up some stash - win win all around!
DeleteThank you so much for this great tutorial. I had to laugh at Vicki's comment. All I’ll say is DITTO! Too funny. But this quilt would be a great way to move o.ut some homespun. Thanks for sharing.
ReplyDeleteYou're very welcome Bonnie! And I wouldn't be surprised if we share other fabrics in the stash - it's certainly time to move them along!
DeleteThanks for this tutorial Susan. This is a great quick to make donation quilt.
ReplyDeleteThis will be perfect for the times when you need a quilt in a hurry for several quilts have to be made for a charity event. Thank you for the well-written tutorial, Susan. Have a great weekend!
ReplyDeleteThanks for sharing the tutorial. I didn't realize each row could be different widths. I had to go back and look at your photos. LOL
ReplyDeleteGreat tutorial and quilt design. This would be a perfect use for fabrics that had larger scale designs you did not want to cut into tiny pieces.
ReplyDelete
DeleteThanks Cheryl! And yes, it would be perfect for large scale fabrics - just keep a theme throughout the quilt so it doesn't become a hodge-podge of fabrics.
Pretty quilts, thanks for the tutorial!
ReplyDeleteSusan, Thank you for the tutorial. I was thinking this may be a great way to use up some floral fabric I have that I no longer like very much. Next thing I know, I'm cutting them up and making a quilt. Top is done. Needs to be quilted. Thank you for sending a delightful squirrel my way :-) Picture and blog post will come in a couple of weeks.
ReplyDelete