Showing posts with label D9P. Show all posts

Friday, September 13, 2019

My Favorite Block - 9-Patch

It's my day for sharing my block for the My Favorite Quilt Block Blog Hop, hosted by Carla of Creatin' In the Sticks. And what could it be? The ever-versatile 9-patch, recently featured in my Fall Leaves quilt.


Fall Leaves wall hanging quilt by QuiltFabrication

Not only does Fall Leaves feature the favorite 9-patch maple leaf block in two sizes, but the wall hanging version has a 9-patch setting.


Fall Leaves wall hanging quilt closeup by QuiltFabrication

The 9-patch block can be simple squares, 


or incorporate HST's, like in the leaf block,


the shoo fly block,


a snowball,


and the friendship star.


Of course, HST's aren't the only possible design change. The possibilities are endless when other designs are introduced in the squares - check out these blocks:


this could go on forever!

And how about quilts, especially the disappearing 9-patch? A very popular quilt pattern created by cutting 9-patch blocks both horizontally and vertically, then rotating the results. 


Convinced about how great a 9-patch is?? Want to make some, but not sure what size squares to start with for a given finished block size? No need to do any math - it's all done in this handy chart!


The first column is the size square to cut, the second column is the unfinished block size after nine squares are sewn together, and the last column is the finished block size once it's sewn into a quilt top. Notice the finished block size gets pretty big toward the bottom of the chart, but that number is useful to determine a quilt size with a 9-block setting.

And last but not least, create more time for quilting - check out the tutorial Efficiently Sewing a 9-Patch using the chain stitching technique. Now I'm off to play with more 9-patches!

Happy Quilting!


Follow on Bloglovin

My Favorite Patterns

Friday, June 2, 2017

The Dependable D9P

Ever happily cruise down the highway when someone yells 'pullover!', totally throwing a wrench in your life? That's what happened to my quilting schedule, once hubby announced he needed two boy quilts. Though I have multiple projects going right now, I really had to carve out some time to get them done. So here's the yesterday's project, Rocket Ship.


Rocket Ship disappearing 9 patch quilt

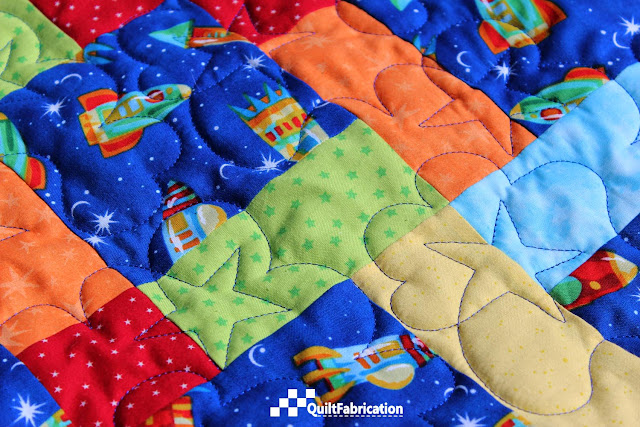
Named for the rocket ship focus fabric,


Rocket Ship closeup 2

it's combined with other fabrics that have stars. And what's more fitting than a star panto in royal Glide thread for the quilting?


Rocket Ship closeup 1

What started out as 5" squares for these 9-patch blocks,


rocket ship 9 patch block

turned into these 13 1/4" disappearing 9-Patch blocks.

disappearing 9 patch block


Final quilt size is 38 1/2" square - a great baby quilt size! It's a wonderful, dependable quilt pattern, especially for a quick quilt. Check out the Disappearing 9-patch tutorial, or the Double Disappearing 9-patch tutorial for instructions on making one.

As for the back of this quilt, it's a multi-colored polka dot print, 

Rocket Ship back

with the added interest of two red corners on the binding.


red corner binding

That's what's called a 'creative solution' when there's not enough fabric to bind the whole quilt!

As for the second quilt, it's going to be from these scraps that were with the small amount of that cute duck fabric,


aqua duck fabric scraps

found in a separate bag with the aqua scraps. Only have the aqua pinwheels for the Stash Lab project left to go, then I'll declare aqua a finish. Phew!

Have a wonderful weekend quilting!


Friday, April 17, 2015

Primary Brothers

Mark another project off the list! The baby quilt that hubby needed for his coworker is finished, plus it came with a bonus quilt. A 2-for-1! How awesome is that?

Introducing the Primary Brothers, 
titled as such because they're composed of the primary colors, and they are two quilts from the same block. And I couldn't think of anything more creative!

Primary Brother 1,
composed of four D9P patches and sashing, is my favorite. We're not supposed to have favorite children, but hey, it happens. To see what a full D9P looks like, see my disappearing 9-patch tutorial.

Originally, I wanted one top of D9P blocks, but unfortunately, I only had enough fabric for a little more than 6 blocks. And six blocks just don't look right for this pattern. But no worries, I figured out a solution. Deciding to use four of the blocks for Primary Brother 1, two blocks plus parts were used for another top. Thus, like Frankenstein, Primary Brother 2 was born.
A bit odd, but there is some symmetry to the design. Adding on the borders on both quilts brought them up to around 40" square, which is a perfect size for an unpieced back. We're talking efficiency here!

Quilting these two was a breeze, as the backing was loaded with the long edge (selvages) to the rollers. The tops were placed side by side, with an inch of space between, tacked down, and the star panto quilted end to end.
Incredibly efficient!

Keeping in this mode, the binding is the same for both, with the little yellow piped edge machine stitched down. 

No time for hand sewing the binding here! The piped binding is becoming my go-to binding method when a) it's appropriate for the top, and b) the quilt needs to be finished. It's time I do a tutorial on it, so look for it on the next post.

Quilting is hard to see again, but it's a simple little star panto.
And the back is a flannel that I had which had primary colors in it.
A great finish to two cheerful little quilts!

Have a great weekend!


Monday, September 9, 2013

A Sweet D9P

Wanted to post about this sweet Disappearing 9-Patch as it's about to disappear from my life. 
That is to say, the baby girl it was made for has made her entrance into the world, and now she gets to enjoy it.

The medium pinks were pulled from my big bin of nickel squares, and the solid maroon and white were pulled from the stash.  Those two compliment the pinks so well that they really make the D9P sing!  For a tutorial, check out efficiently sewing a nine patch.

This quilt was quilted with Glide Purple Rose, using one of my favorite pantos, Alfresco.
Just love the big flowers!  So sweet!

And as with all of my baby quilts, I put flannel on the back.  Found a matching pink with small flowers for this one.
Hope she likes it!

Happy Quilting


Saturday, July 27, 2013

Efficiently Sewing a 9-Patch

The great thing about baby quilts is they are small and quick to make.   I made a 39" x 39" top in two hours yesterday, using an efficient method of sewing 9-patch blocks. 
The blocks were re-cut using the Disappearing 9-Patch tutorial to create the D9P pattern.
But more on sewing those 9-patch blocks!

I dove into my nickel (5" x 5" squares) bin, happy to be using some more up!  Then grabbed some white fabric, and a dark pink for the centers.  Cut those two into 5" squares, then arranged all squares in piles for easy sewing.
Now to the machine for the efficient 9-patch.  One block is sewn at a time.  

Starting on the top row, pick up the top left square and sew a white middle square to it. DO NOT CUT THE THREADS!
Moving to the next row, pick up a white square (position middle left) and sew the center dark pink square to it, making sure the white square is on the bottom.  Again, DO NOT CUT THE THREADS.  This is chain sewing top to bottom.
Sew the bottom left pink square to a white square, and this time, CUT THE THREADS.  Three rows for one block.
Starting on the top row again, sew the top right pink square to the white square from the first sewing.  DO NOT CUT THE THREADS.
In the above picture, the top left square is on the left, and the top right square is being sewn to the middle white.  The arrow points to the threads linking the next row.

Open up the next row, sewing a white square to the middle dark pink.  DO NOT CUT THE THREADS.
The arrows in the above picture point to the chains linking the rows together.

Finally, open the last row, sewing the bottom right pink square to the bottom middle white one.  CUT THE THREADS.  This is one block.
The beauty of sewing a 9-patch this way is that the pieces stay in order and the whole unit can be set aside in one piece so that another can be sewn.  When all units are ready, take them to the ironing board for pressing.
Pressing follows the standard 'press to the dark side'.  By doing this, the seams nest when sewing the rows together.  Once pressed, and still not cutting the threads that link the rows (shown at the arrows), turn the top row down, nest the seam and pin. 
Move that row out of the way, turn the bottom row up, nest the seams and pin.
Now all the blocks are ready to be chain stitched, stitching down one side of the block, one right after another.
When one side is done, chain stitch the other side.  Cut the blocks apart and press open.  Ta da!  A really fast, efficient way to turn out some 9-patch blocks.
I said above that I re-cut these to make the Disappearing 9-patch.  I put the resulting blocks together in the following setting
but I also came up with this
I liked this one just as well and think it would look terrific for a bigger quilt.  I'll keep it in mind for another day!

Happy Quilting!