Showing posts with label applique. Show all posts

Tuesday, March 2, 2021

Sweetheart Rose for Quilt Block Mania

Welcome to another monthly themed block for Quilt Block Mania. The month of March is full of flowers, and I've designed a pretty one for you, the Sweetheart Rose.

pink red and maroon rose on a quilt block

Full of red heart petals on a fine pink petal background, this flower is just bursting from a dark bud to a beautiful multicolored rose! That pink to red color scheme is based on the paper roses inspiration from Design Seeds.
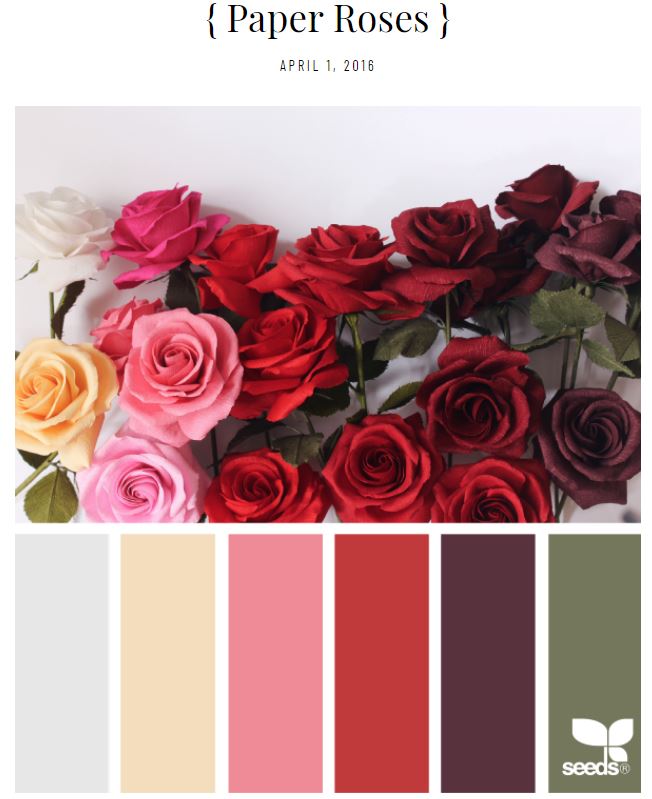
pink hues from a bunch of roses


Roses are such a wonderful flower - I like nothing better than to bury my nose in a fragrant blossom! Unfortunately, I don't have stemmed roses in my yard, relying on neighbors for my rose-scent fix. 

But I do have several carpet rose bushes in my front yard, all featuring hot pink flowers. Though they don't carry a scent, they're still very pretty roses. Before they bloom in April, these bushes send out multiple branches at least 4 feet into the yard and loaded with buds. 

Once blooming starts, they put on quite the show for several weeks, creating a stunning spring display in my front yard. Since the season is a bit early yet, I'll just have to content myself with a closeup of one of these hot pink beauties I took several years ago.


As for that wonderful rose scent which can be hard to find as so many roses have had the scent bred out of them, I'll make do with the neighbors bushes or maybe a rose oil cream. Of course, just looking at my Sweetheart Rose block could conjure up that wonderful rose scent! Hmm, this block may eventually go in a larger quilt, one full of roses. Sensory overload!

As usual, in patterns that I design, the Sweetheart Rose features easy piecing and applique. For one block, fat quarters and scraps are all that's needed, but if pairing it with the blocks from the Quilt Block Mania group, it's best to go with yardage. That way, the whole quilt will look cohesive with the same fabrics and colors.

pink and red flower quilt blocks

Here's the full designer list for more flower blocks:

Orchid Quilt Block by Carolina Moore
Rose Garden by Slice of Pi Quilts
Happy Flowers by Carolyn Burgess
Double Flower by Devoted Quilter
Faux Flowers by Blockofthemodotcom
Mod Tulip
Enchanting Echinacea
Rosebud Wreath at Patti's Patchwork
Flower Power - Cotton Street Commons
Dottie's Garden by Heidi Pridemore
Poppies by Duck Creek Mountain Quilting
Pretty Posies at Perkins Dry Goods
Mittens Smells the Roses at Puppy Girl Designs
Wildflowers by Studio R Quilts
Sweetheart Rose by QuiltFabrication
Flower Patch at Orange Blossom Quilt Design Studio
Scattered Petals by Snowy Days Quilting
Scrappy Tulip by Katie Mae Quilts
Happy Bloom Block by Oh Kaye Quilting
Buzz along
Everything's Coming Up Roses by Inquiring Quilter
Spring Posies by Blue Bear Quilts
Four Roses
Pieceful Crocus Focus
Improv Bloom by Love to Color My World
Sue's Field of Flowers by The Quilted Diary

The pattern includes full size and reversed templates to either trace or print onto fusible web. To make the rose using needle turn applique, be sure to add a 1/4" seam allowance.


My Sweetheart Rose block finishes 12" x 12" and is currently unavailable - sorry. 

Feel free to tell others about QuiltFabrication and become a follower yourself through any or all of the following: direct delivery of posts to your inbox, or by following on Bloglovin, Pinterest, Instagram, Facebook, or YouTube.

Happy Quilting!


My Favorite Patterns


Friday, January 22, 2021

Flexi-Fuse Fusible Web Review

I'm so excited that I finally got to share my long-dreamed-of Snowflake runner yesterday. Just look at those snowflakes - they came out even better than I could have imagined!


white snowflakes on a blue background

 
A large portion to the success of this Snowflake runner is owed to a fusible web product called Flexi-Fuse (affiliate link). I had ordered both a Flexi Fuse pack of 10 (affiliate link) plus a pack of 25 (affiliate link) several months ago, but hadn't tried it yet. This was the perfect project for testing.

fusible web

For starters, I would put the fusible 'weight' at around a light to medium, with good adherence to the backing paper. Some fusibles fall off the backing easily, but this is not one of those. The fusible itself has a nice grid/weave feel to it, giving me confidence that my appliques will stick.

Another reason I chose this product was because of the convenient 8" x 10.5" sized sheets. It dawned on me I could print my snowflake outlines, eliminating the tracing work. 

Unfortunately, nowhere on the package does the product say it can go through a printer. But hey, I was willing to try, even if it meant sacrificing a sheet. 

Usually I'm wary of putting items, such as a fusible sheet or freezer paper, through my printer. To get around that issue, I'll tape a regular piece of paper to protect the fusible sheet or to cover the slick freezer paper. 

Using small pieces of tape along the top of the paper edge which feeds into the printer, it provides protection for the fusible, or gives the printer something to grip instead of slippery freezer paper.

flexi fuse sheet taped to paper for printing centering


Something that I noticed when taping - the Flexi Fuse sheet is 8" wide. To make sure my snowflakes printed in the 8" space, I made sure the Flexi Fuse sheet was centered on the paper for printing. I could have ordered the Flexi Fuse Roll (affiliate link) and cut my own sheets to size, but these sheets are much more convenient. It certainly pays to check the width of fusible printer sheets before printing a project. 

In the picture below, the Flexi Fuse sheet is centered and taped to paper, ready for printing. Behind it is a snowflake printed out on Flexi Fuse.

flexi fuse fusible web


The instructions for ironing the fusible sheet to fabric are easy and straightforward. Cutting out the snowflake shapes was also easy - the fusible stayed on both the fabric and the paper, and no loose threads or fuzz along the edge. 

Just as easy was fusing the snowflakes to the background fabric - no damp press cloth required! Check out the clean edges and no gumming up on the needle.

white snowflakes on a blue background


As for the final hand the appliques have, I'd say soft, especially since no excess Flexi Fuse was cut out from the snowflakes. Every single bit of white is completely fused to the background. It's certainly a nice feel!

I'm glad I finally got to test Flexi Fuse, especially with these snowflakes, and I'm looking forward to using it again.
Happy Quilting!


Follow on Bloglovin

My Favorite Patterns

Tuesday, December 1, 2020

Star Splash - Quilt Block Mania

Another month, another group of blocks from the Quilt Block Mania group! 

numerous blue, purple, pink star quilt blocks

We had a rather unusual, but pretty, Design Seeds palette of colors this month for Stars, full of blue, purples, and a red - a group that I would not associate with stars. 

design seeds color palette featuring stars

I have to say, it made designing a bit of a challenge, making this month's block simple, yet playful. 

purple star with teal teardrops on a navy blue background

If one was feeling creative, the center could be another color. But when put as is with all the others, as a group they'll make a great star-themed quilt.

Check out the other coordinating star blocks from all of these great designers!

Stargazing Sue
Starburst at Slice of Pi Quilts
Massachusetts Star with blockofthmo.com
Nova Star at Always Expect Moore
Nativity Star
Star Bright - Cotton Street Commons
Five Pointed Star at Duck Creek Mountain Quilting
New Year Star at Stash Bandit
Poinsettia Star
Wish Upon a Satar by Heidi Pridemore
Falling Star at Pretty Piney Quilts
Star Splash at QuiltFabrication
Seward Star at Blue Bear Quilts
Moon Star at Perkins Dry Goods
Starburst at Patti's Patchwork
Cherokee Star
Christmas Tree Star
Christmas Star by Oh Kaye Quilting
Starfish by Appliques Quilts and More
Snowy Star by Seams To Be Sew
Combination Star by Devoted Quilter
Ablaze by True Blue Quilts


purple star outline on a dark blue background


The finished 12" x 12" Star Splash block is free - just click on the download button below.


In downloading the pattern, you agree not to share the file with others, but direct them to the QuiltFabrication.com/Star Splash Quilt Block Mania post. Feel free to tell others about QuiltFabrication and become a follower yourself through any or all of the following: direct delivery of posts to your inbox, or by following on Bloglovin, Pinterest, Instagram, Facebook, or YouTube.

Happy Quilting!


QuiltFabrication Posts to Your Inbox
Follow on Bloglovin

My Favorite Patterns

Monday, November 23, 2020

Gnome for the Holidays

Let's finish up this year in a festive way, adding some fun with Gnome for the Holidays!

red gnome next to a house with trees by QuiltFabrication

I don't know about you, but I've been seeing gnomes everywhere - quilt patterns, embroidery patterns, sales fliers, websites, and stores. They're so darn cute, I had to make one myself!

red gnome with beige snow covered house and a snowflake


Gnome for the Holidays is so easy with fusible applique. The plump little gnome next to his Christmas-y snow-covered house, plus the wonky, snow covered trees makes such an adorable little table decoration!
 
red gnome, beige snow covered house and three snow covered pine trees


As a table runner, Gnome for the Holidays measures 14" x 36".

red gnome, beige house, pine trees for a table runner by QuiltFabrication


Or make a small wall hanging by removing the right hand section with the extra trees - it would be just as cute!

red dressed gnome, snow covered beige house, pine tree

If your seeing a lot of gnomes and just have to have one, the Gnome for the Holidays table runner pattern is now available in my Etsy shop. As usual, with a new pattern release, special pricing is going on now through CyberMonday, November 30. 

And if your interested in a learning how to use a freemotion zigzag to stitch around those appliques, avoiding all the fabric turning, check out last week's tutorial, Freemotion Applique.

Happy Quilting!


Follow on Bloglovin

My Favorite Patterns

Friday, November 20, 2020

Freemotion Applique

Bet you're wondering what freemotion applique is. 


pine tree stitched with freemotion applique
 

It's a process of using the machine's zigzag stitch along with it's darning or freemotion foot to stitch down the edges of fused appliques.

So, how is this different than any zigzag to secure appliques? This technique doesn't involve stopping with the needle in place, and rotating the fabric. It's all stitched moving the fabric side to side or up and down, just like freemotion quilting.

Bet you're wondering why. For me, the quicker I can get applique stitching done, the better. No stopping to turn the fabric shaves off some precious time.

Now I know this technique is not for everyone, as it does take a bit of control to move the fabric to catch the zigzag. But with practice, it moves along fairly quickly. And that's a big plus in my book!

Go ahead and watch this little video, Freemotion Applique, that I have of the process. 

Note that when I'm on a more horizontal plane, the stitches zigzag at an angle, like this,
 
as seen on this tree, in both white and green thread.

applique stitching around a pine tree


And when going around curves, the angle switches direction.


Here it is on the gnome's nose.

gnome nose

Looks pretty good, right? For me, I love this technique for speeding up my applique stitching. Not sure if the quilt police would though!

As far as my gnome project, it will be here Monday - stitching, quilting, and pattern writing have taken longer than expected.

Happy Quilting!


Follow on Bloglovin

My Favorite Patterns

Monday, July 27, 2020

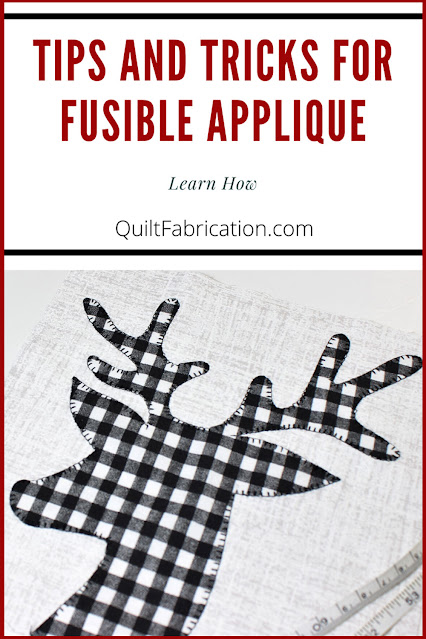
Tips and Tricks for Fusible Applique

Applique, by definition, is to decorate a large piece of fabric with other pieces of fabric to form pictures or patterns. It allows quilters to create intricate designs, whimsical creatures, and even modern art - that's how wonderful applique is. By far, the easiest and fastest method is fusible applique, and with the following tips and tricks, it's even easier! 
Click on the picture to see the video


black and white check deer head on grey background for tips and tricks for fusible applique tutorial by QuiltFabrication
 

Tips and Tricks for Fusible Applique Tutorial


Trace the reverse of the pattern

Before tracing any design onto paper backed fusible web, be sure it is the reverse of the design.
Fusible web is always applied to the wrong side of the fabric, which means when the piece is turned to the right side, it reads in the correct orientation. This is especially important for lettering!! Below, the deer pattern looks to the right, and is traced the same, but on the finished piece, he will look to the left.


fusible web with deer head drawn on paper side by QuiltFabrication

Rough cut a 1/4" on the outside and inside of the tracing

Cut out the fusible tracing, 1/4" away from the line, on both the outside and the inside. It doesn't have to be perfect - just leave enough to secure the line when fused.


rough cutting around the drawn deer tracing on fusible web  by QuiltFabrication

Why cut out the inside?  It reduces the stiffness associated with fused fabric, and allows for the background to be cut away.
 
Tip: when cutting multiples of the same shape, staple them together - see the fusible applique video for more!

Add alignment marks for fussy cutting

I'm placing several deer on a plaid fabric and want them to look the same. By adding alignment marks to the fusible tracing, I can successfully achieve that. Check out this tutorial, Creating Identical Fussy Cut Fusible Pieces, for more detailed instructions.

fussy cutting alignment marks made on fusible web deer head drawing  by QuiltFabrication

Follow Manufacturer's directions for fusing

I can't say this enough - follow the manufacturer's directions for both fusing onto the wrong side of fabric, and for the final fusing. Each is different! The fusible I use requires 5-8 seconds with a hot, dry iron for fusing to the fabric wrong side. Too little, and it won't fuse; too much and the glue melts, leaving nothing behind. The final fusing requires a damp press cloth, a iron set at wool, and 10-15 seconds. Quite different, so be sure to follow the directions!


line up aligning marks on wrong side of fabric before fusing  by QuiltFabrication

Cut out applique on the line

Once the first fuse is done, carefully cut out the applique piece on the drawn line. This is the final shape that goes on the background.

fusible applique deer head is cut out on the drawn line  by QuiltFabrication


Prepare the background

Size
It should be noted that applique stitching tends to shrink the background. I recommend cutting the background 1/2" bigger all around, completing the stitching, then trimming the background to the final size.

background quilt block made half inch larger before applique is fused  by QuiltFabrication

Placement
Several methods can be used for placement on the background:  a light box with the pattern underneath the background; folding the background in half in each direction and making light creases to mark the center; or using a ruler to measure from the background edge to the applique. View the Tips and Tricks for Fusible Applique video to see these in action for the deer applique.

Final Applique Fusing

Once the applique is placed on the background, it's time to fuse it down! Follow those manufacturer's directions for successful fusing. 

black and white checked deer head on grey background  by QuiltFabrication


Applique Stitching

There are numerous stitches available for finishing applique pieces. The most popular are a blanket or buttonhole stitch, zigzag, or a straight stitch. It's completely up to you, as is the choice of thread, both in weight, material, and color. I recommend testing threads, stitches, and tension settings on scrap fabric before starting the stitching on the final project.

Final Trimming

The very last step in applique is to trim not only the background to the proper size, but to also trim out the excess background fabric behind the applique. Remember the section of his head and neck that was trimmed out of the fusible web? Now it's time to remove the non-fused fabric in that same area, to reduce fabric bulk.

If you're lucky enough to have an applique with an open edge at the background edge, it's easy to cut out the excess. In the deer's case, the bottom edge is fused, meaning I need to cut a slit in the area to remove. By just pulling the applique and background fabrics apart in that spot, I can clip the fold enough to get a scissor in to trim along the line of fusible.

background fabric behind deer head applique being cut out  by QuiltFabrication


He's finished and so are the tips and tricks for fusible applique

tips and tricks for fusible applique with a black and white checked deer head by QuiltFabrication

Until next time, 
Happy Quilting!
Susan


Follow on Bloglovin

My Favorite Patterns

Monday, March 16, 2020

Spring Fling Table Runner

Time to welcome spring! And how better than with Spring Fling, my new runner pattern with a beautiful flower spray!


Spring Fling table runner by QuiltFabrication

Spring Fling has been tossing around in my head for over a year, and I'm happy to say it has finally come to reality! Just gorgeous, and well worth the wait, no?

All of the appliqued flower pieces are fused onto a solid blue background, with pieced borders finishing off the edges. Simple and elegant.


Spring Fling table runner quilting by QuiltFabrication


The quilting is just the same - simple and elegant. Long ago, when I was a cake decorator, I remember heeding the advice to give it a KISS - keep it simple, stupid. Yes, that's rather rude, but it's good advice to live by. With that in mind, I ditched my first idea of echoing the elements and alternating filled squares,


Spring Fling table runner original quilt plan

to a dense stipple around the applique elements to make them pop, 


Spring Fling table runner stipple quilting by QuiltFabrication

and varying widths of vertical lines in the background. Again, simple and elegant.


Spring Fling table runner straight line quilting by QuiltFabrication

The flower center is just as pretty, as the quilting has just enough to add some detail without distracting.


Spring Fling table runner flower center by QuiltFabrication

Notice that the flower is also a four-leaf clover. Yes, I made this in part to celebrate St. Patrick's Day, but it also looks lovely in other color combinations. How about a lighter blue for Easter?


Spring Fling table runner in light blue by QuiltFabrication

Perhaps a soft peach and olive?


Spring Fling table runner in soft peach and olive by QuiltFabrication

Or maybe hot pink for Valentine's Day?


Spring Fling table runner in hot pink by QuiltFabrication

So many color possibilities abound!


Spring Fling table runner closeup by QuiltFabrication


Spring officially arrives March 19, and I'm ready to celebrate! You can too, with the Spring Fling table runner pattern in my Etsy shop.

Happy Quilting!


Follow on Bloglovin

My Favorite Patterns