Showing posts with label hexies. Show all posts

Monday, April 18, 2022

Hexie Flower Quilt Idea

Now that my hexie flower appliques are finished, it's time to make the sashing and get this quilt finished up.

pink hexie flower appliques


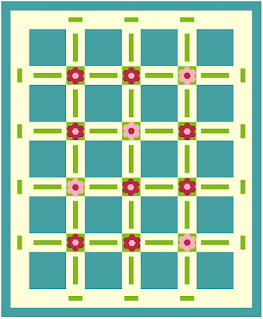
Though the test sashing pieces seen above were made with individual pieces, I've now gone the more efficient route by making a strip set for this quilt plan that I've dreamed up, below.


With the hexie flower blocks at an unfinished size of 4 1/2" square, the sashing needs to be that wide too. That makes the strip set composed of a 6 1/2" x WOF green background strip and 2 (two) 1 1/2" x WOF yellow strips. With the yellow sewn on each side of the green, I've got a strip set.

green and yellow strip set


Cutting 1 1/2" strips will make up the center of the sashing pieces. All I need to add are the two yellow side pieces, at 2" x 8 1/2".

green and yellow strips for sashing units


For the border pieces, I'll make another strip set of green background 3 1/2" x WOF with 2 (two) smaller yellow strips at 1" x WOF. 


Finally, I'll add 2 (two) 2" x 4 1/2" yellow side pieces for those little 4 1/2" square blocks. 


To finish off the inner border, I have yet to cut 14 (fourteen) 4 1/2" x 8 1/2" yellow pieces and 4 (four) 4 1/2" x 12 1/2" yellow pieces for the corners. Add on the final teal border at 2 1/4" and the top will be finished.

More updates to come - Happy Quilting!


Follow on Bloglovin

Enjoyed this post? Don't miss out - get posts delivered directly to your inbox with follow.it.  

           
GET POSTS BY EMAIL


My Favorite Patterns

Friday, April 15, 2022

Appliqued Hexies

My hexie flowers have become adorable appliques!

pink hexie flowers on a green block

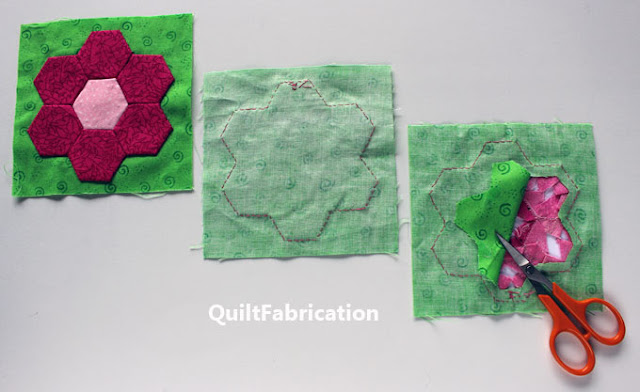
When I posted about these before, I had several people ask me my process for appliqueing the hexies to a background block. So, I thought I share my process since hexies are usually joined together for make a quilt, not appliqued.

I started with hexie flowers, leaving the papers and basting intact.

pink hexie flowers on green


A bit of glue applied in the seam allowances at the side joining seams helps to keep the hexie applique in position on the background - see the white ovals below for locations. Don't overdo the glue as it makes it harder to cut out the background later.


I tried pins, but with the papers, both the flower and the background got distorted. Glue was an easier option. And as for the background block, it's cut 1/4" larger than the finished size needed. Trimming to the correct size is the last step.

Using a hand applique stitch, the outside edge is stitched to the background with an approximate 3/16 inch stitch length. It's also a good idea to have a stitch at the points and the inner corners to keep that flower secure. Once the stitching is complete, the background can carefully be trimmed out.

pink hexie flowers on green fabric


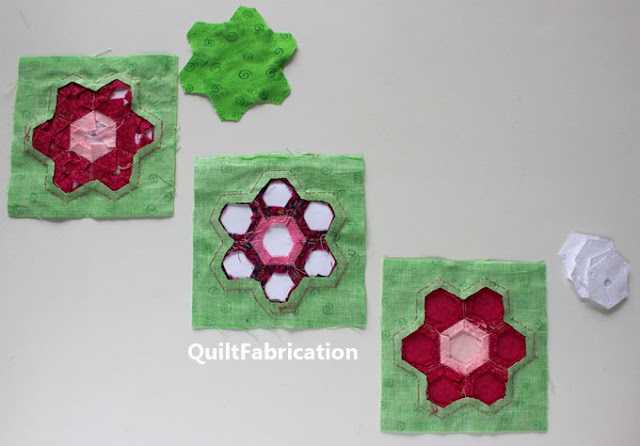
When I say carefully, I do mean carefully as in just cutting the background fabric. This does require a bit of tugging to release the background from the hexies at the glue points, easily done by slipping the scissor or the Purple Thang in the background opening. It's important to only cut the background at this stage and not the fabric that makes up the hexies.

Once the background is removed, trim all of the excess hexie fabric seam allowances to 1/4" to remove fabric bulk. Below is the background trimming in progress, then the background fully removed, and finally, the hexies with a 1/4" seam allowance.

pink hexie flowers on green


Now all of those hexie papers can be removed for use again until the edges get worn down, they have too many holes, or have turned soft and flexible. I will say that the hexie papers with a hole punched in the center are super easy to remove. Those without require a bit of digging along the seam edge, but they do come out.

Below are backside pictures of an untrimmed hexie, a trimmed hexie with papers intact, and finally, a hexie flower with the papers removed.

pink hexies on green


The final touch is to trim the background to the proper block size, making sure the hexies are centered in the block. Though a bit time consuming, all of that trimming work was worth it - these hexie flower appliques feel wonderful! Pliable and with no extra fabric weight - perfect!


Isn't nice to know that there are options for hexies? Makes me want to stitch up some more, though this time I'd feel better if I had a quilt idea first! 

Happy Quilting!


Follow on Bloglovin

Enjoyed this post? Don't miss out - get posts delivered directly to your inbox with follow.it.  

           
GET POSTS BY EMAIL


My Favorite Patterns

Friday, April 8, 2022

Hexie Project in the Works

Hooray! I am FINALLY doing something with those hexie flowers I made 2 years ago!


Thought I'd show you an in-progress picture. There's an individual hexie flower at the bottom, a hexie flower glue basted to a slightly oversized block on the left, and a finished hexie flower, stitched down, block trimmed, basting and papers removed, and finally, stitched to two sashing pieces shown at the top. Wow - that's a lot to take in!

BTW, the original Hexie Progress post is worth looking at - it has beautiful flower pictures from Thailand, one of our favorite trips, making me even more excited to finally use these flowers! It's been a goal for over a year, and a tough one for sure. 

But a stroke of genius hit the other morning - and I do love it when that happens!

Here's the back story. For some reason, I seem to be on a mission of using my scraps this year. The bins are stuffed full, making the drawers hard to close. In January, I started with red due to RSC2022, which is still an in-progress red/white quilt. Then, this March, I moved on to aqua/teal, as I have lots of scraps in that color!

So much so, that I started making 8.5" blocks and just kept going till I had 24.


Did I have a quilt plan? No. I just knew I needed at least enough for a 4 x 6 block setting, then I'd figure out the rest.

After throwing some blocks on the design wall, in both a straight set and an on-point set, I decided two things. I wanted a pale yellow background, plus some hot pink and bright green to go with these aqua/teal blocks.

That's when the genius hit - I have some hot pink hexie flowers just waiting to go on a quilt! YEAH!!

With one flower tested for stitching, trimming, and such, here's some of the others glue basted to a background block and waiting for me to stitch them down.


And that's the stage this quilt is at now. When a few more are done, I'll share the overall quilt plan. Until then, 

Happy Quilting!


Follow on Bloglovin

Enjoyed this post? Don't miss out - get posts delivered directly to your inbox with follow.it.  
           
GET POSTS BY EMAIL


My Favorite Patterns

Friday, July 3, 2020

July 2020 Book of the Month - Triangle Block Tool

Hi all! Today I'm sharing a book for those who love quilts full of triangles, diamonds, and hexagon blocks - it's the Quick & Easy Triangle Block Tool (affiliate link) by Sheila Christensen, and C&T Publishing.

quilt book with 100 triangle, diamond, and hexagon quilt block ideas

And WOW! Does this book offer a variety of block designs to really up the drama in your quilts! Just look at these examples:

Canterbury
triangle quilt block made of hexagons and triangles

Interweave
hexagon block with interwoven stripes

and my favorite, Orchid.
striped diamonds joined together to make a triangle quilt block called orchid
Full of pictures, diagrams, and size charts, plus thorough cutting instructions given in the beginning of the Quick & Easy Triangle Block Tool book (affiliate link), even a beginner could learn how to cut triangle, diamond, and hexagon shapes. And not just the easy way, with rulers of those shapes, but the instructions ALSO include using straight rulers. This makes me super happy, as I'm someone that limits the number of specialty rulers in the studio, so the instructions for using straight rulers is greatly appreciated. And it's easier than you think, especially with the easy-to-follow pictures and drawings.

a page giving instructions for how to cut triangles from fabric for quilting

Each block (there are 100 of them!) includes an outline drawing of the pieces, a suggested color layout, a diagram of the block parts, and finally, a picture of the block in fabric.

emporer triangle quilt block drawing and pieces

Each page also includes the cutting size chart for each shape and for different block sizes. Each block comes in four different sizes. How convenient is that - no need to do quilt math!

Emporer triangle block cutting chart

Finishing off each block page, there are quilt layout ideas for each block, which certainly gets those creative juices flowing.
Emporer triangle block quilt layout ideas

Here's what a full block page looks like, this time with the Floating block.

Floating block diagram page from Triangle Block Tool book
What more could you ask for in a quilt book? If you're a triangle, diamond, or hexagon lover, you really seriously need the Quick & Easy Triangle Block Tool book (affiliate link) to make even more stunning quilts! If your not, there's also the companion book full of square blocks, the Quick & Easy Block Tool (affiliate link), in the same format, with 110 blocks in 5 sizes - another must have. 


Happy Quilting! And thank you, C&T Publishing for providing great quilt books!


Follow on Bloglovin

My Favorite Patterns

Monday, February 24, 2020

Hexie Progress

With numerous blogging commitments lately, I'm finally able to share about our long, 18 hour plane rides, perfect for making some progress on those hexies. Certainly that's enough time for a lot of hexie basting, but I only got through 9 flowers worth. Eating, sleeping, and movie watching occupied most of my time. 


basted hexies and travel sewing supplies

Notice in the picture above the orderly storage after basting, the hotel sewing kit for using up thread in basting, and the dental floss container for cutting thread cause I didn't want to risk losing scissors to airport security again. And sandwiched in between two cardboard pieces are the fabric squares to prevent wrinkling.


fabric squares between cardboard to prevent wrinkling

My original hexie flower idea has two values, but my fabric choices may be too far apart in value. They look a bit dotted.


first hexie flower idea

Hubby suggested this version, which is quite nice. Notice no yellow centers. Combined with a darker yellow, I'd have  another flower color to use in the quilt.  


second hexie flower idea

Which flower idea do you prefer? I guess I'll decide once I come up with an actual setting for these flowers, ie, a quilt plan. Nothing like starting a project without a plan!

So, where did we go on such a long flight? Chiang Mai, Thailand, braving the coronavirus outbreak with masks, hand sanitizer, and anti-bacterial wipes. Days before, we were on the fence as to whether to cancel or not, mostly over concerns of getting back, as neither of us wanted a quarantine. 

But there were no issues at all, we're both fine, and had a wonderful time! The crowds were low, and I'm not sure how anyone could be sick in 95 degree heat, but I guess it's possible. Here's highlights from our trip:

the Flower Festival, full of beautiful floats,


Flower Festival Thailand 2020 float

the parade queen and her court,


Flower Festival Thailand 2020 float with queen and princesses


beautiful costumes,


Flower Festival Thailand 2020 costume


especially these flowers.


Flower Festival Thailand 2020 flower costume

And believe it or not, these are carved watermelons found on one of the floats. Just amazing!


carved watermelons

Here's the scooter we rented


scooter


to get out of town for a hike,


hike to waterfalls

and to play in the limestone created Sticky Waterfalls.


Sticky Waterfalls Thailand

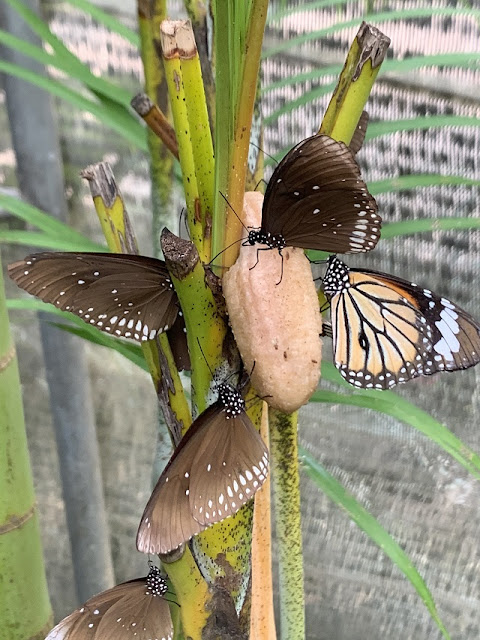
We also checked out a butterfly house,


butterfly house

and an orchid farm.


orchid farm


orchid farm orchid


Then spent 6 hours touring around the lovely Royal Park Rajapruek,


Royal Park Rajapruek


Royal Park Rajapruek grounds

where they had a greenhouse full of orchids!


Royal Park Rajapruek orchid greenhouse

We also saw some traditional Thai dancing, especially the Fingernail Dance,


Fingernail Dance


and took two Thai cooking classes, Tom Yum Thai, and Thai Akha. Both were excellent and delicious!


Thai Akha cooking class

Then we collapsed each night at our hotel, Yaang Come Village, a jungle oasis in the heart of a big city - heaven!


Yaang Come Village Chiang Mai Thailand

So for now, those hexies are on hold till the next trip in a few months - still more to come.
Happy Quilting!


Follow on Bloglovin