
Showing posts with label quilting. Show all posts

Tuesday, February 25, 2025

Sad News for Joann Shoppers

I'm sure you've heard the news by now. Joann has filed for bankruptcy (again), and will be closing more stores. Like over half - approximately 500 of 850. To read the press release and find out what stores are closing, click Joann Closing.


Now I know some of you quilters may be aghast that I shop at Joann. Where I live, it seems to be a taboo subject to mention. Who can resist a store within five miles, and 4 others within a 30 minute drive. Though I'll admit there was some quality missing in their fabric lines, you sure couldn't beat the selection and price!

I always loved stepping into the store and seeing the current display of seasonal fabrics just screaming 'take me home'! Having based most of my quilts around the seasons, these displays were absolute candy!

Of course, I can't leave out the fairly large selection of other prints available in a wide array of colors. A half yard here, a yard there, and I've got myself a wide selection of fabrics to play with. I was always searching for blenders, or for prints that hit a certain theme. I'm not known for buying a designer or fabric line. I'd rather select for myself.

Most of us quilters are about the fabric. But there's also the pins, needles, cutting tools, thread - all the additional items used for our craft. And batting! Joann had lots of choices there and usually on sale. I'll miss that.

For now, one store 30 minutes away will remain open. For how long, who knows? Not sure where I'm going to go when I need thread or batting. Heaven forbid that I have to turn to online shopping! I like to actually SEE the fabric. Guess I'll frequent the quilt shop close by, but it's just not the same.

So, a sad Adieu, Joann! Thanks for all the fabric and memories (especially Black Friday sales!). Maybe a buyer will step up and bring the store back. If not, I'll miss you.

Anyone else out there share my sentiments? Leave a comment!  

Happy Quilting


Feel free to tell others about QuiltFabrication and become a follower yourself through any or all of the following: direct delivery of posts to your inbox (sign up below), or by following on PinterestInstagram, or YouTube.

Enjoyed this post? Don't miss out - get posts delivered directly to your inbox with follow.it.  
           
GET POSTS BY EMAIL


My Favorite Patterns

Monday, February 7, 2022

Blended Quilting Revisited

While zipping around the background of the Love runner, filling it with stippling, I was reminded of how important it is to blend the stitching in with the piecing. 

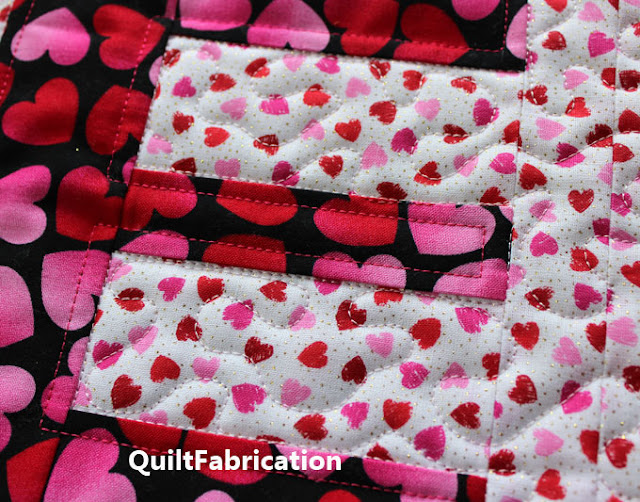
valentine fabrics make an E

Personally, I think any background fill just looks better when the piecing seam is used as a travel line for the fill, giving the impression that the piecing sits on top of the fill. The fill is, after all, in the background, right?

Look closely at the picture above of the letter E from the Love runner. I've stitched those stipple lines right up to the piecing, traveled along the seam, then come back out into the background to complete the fill. Doesn't it look as if some of that stippling is behind the piecing of the E?

Thinking about this prompts me to revisit my Blended Quilting tutorial, which explains in more detail how to do this. Let me show you!


This all started while quilting the Holiday Forest runner. The background fill is similar to a stipple, though here it's in a more horizontal direction to imitate a  landscape of hills or of a breeze blowing through the trees. 

It was important that the background quilting blend in with the trees. And by that I mean making the background quilting in the small areas relate to each other, creating unity between all the small spaces and a consistent landscape theme.


Notice the landscape lines in between the trunks. See how they hit the trunks, follow the trunk for a small distance, and come back out again? Just like the stippling for the E block.


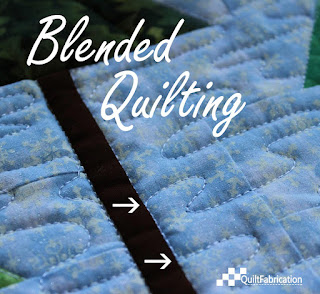
So here's what I mean by 'blended'. When there is a small amount of piecing separating areas, align the quilting lines on each side of the piecing. Then, just like my stippling for the E block, it will look as if the piecing is on top of the background fill.

This creates not only unified quilting between separately quilted areas, but it's also visually pleasing as the eye tends to follow these lines. 


The drawn example below is what not to do. It creates a quilted area that doesn't relate to the other piecing - it just bounces back and forth. The background doesn't flow from one area to the next.


The correct way is to quilt around pieced shapes, letting the quilting bump into the object with stitching that follows the seam line, and then resuming in the background. 


This concept applies to any background fill, not just the landscape lines or stipple I've shown you. All it takes is a bit of planning, and the willingness to do a bit of stitch-in-the-ditch to follow the piecing. Hope you give this a try as the results are worth it!


Happy Quilting!


Follow on Bloglovin

Enjoyed this post? Don't miss out - get posts delivered directly to your inbox with follow.it.  
           
GET POSTS BY EMAIL


My Favorite Patterns

Monday, February 8, 2021

Stay at Home Round Robin - Checkerboard

It's round 4 of Quilting Gail's Stay at Home Round Robin quiltalong, and this week's choice is 'checkerboard'.

red and orange checkerboard quilt round

I'll admit, I wasn't overly wild about the prospect of making 1" squares for a checkerboard, but realized it's what the quilt needed. The other three rounds are busy - it was time to give this quilt a round of rest!

For the checkerboard, I pulled out red again from the center and piano key round. But what to pair it with? There was already enough blue and green, and I certainly didn't want to go down the bright yellow path again. 

Instead, I went with an orange that leans toward red for a perfect pairing.

red and orange checkerboard quilt border

The combo of the two colors, easily made into a checkerboard using strip piecing, certainly calms everything down and lets the eye rest. Because I ran out of the orange, the corners are just the red fabric, which also blends in nicely but also allows for border size fudging.

Check out how my other round robin quilt friends are creating their rounds, and be sure to link up your round this week with Roseanne and Sue at Home Sewn by Us.


Now onto the next round, which will probably be blue. I don't really want green because that starts leaning toward a Christmas color scheme being right next to red, which is not where I want this to go. Remember there's a patriotic quilt in the center!

Until next week with another round, 
Happy Quilting!

Follow on Bloglovin

My Favorite Patterns

Saturday, January 9, 2021

Fabric In and Out 2020

I have to confess, I don't know which quilter started this, so forgive me for not giving this person credit. I'm talking about keeping track of the yardage 'in' and yardage 'out' for the year.

yardage in and out sign on fabric yards


Out of curiosity, I started keeping track in 2019, using 99 yards, but taking in 250 yards in. Yikes! But that 'in' amount should really be 150, as 100 yards went toward making the kits for Winter Feed and Fireworks. Not counting the kit yardage, 2019 now looks a bit better.

2019 ratio
 2 yards out / 3 yards in

Seeing those numbers though, made me want to do better in 2020, using more fabric than I brought in. At first, the COVID crisis helped my cause, putting a dent in physical, in-store shopping, plus low supplies due to factory shutdowns and mega-mask making.

And then December came. A local shop sent several emails advertising a fabric sale for the month, which I resisted several times. But then hubby encouraged me to add to the stash, freshen it up shall we say. 

Oh boy, did the floodgates open! In just 2 weeks, I've purchased 50 yards, which is not boding well for 2021. Yes, not a good start, but it is what it is. How about a look at some of the pretties I found?

From the local shop, these 1 yard cuts for the green stash.

selection of green fabrics

And these blues, aquas, yellow and orange. I love that dotted print - it has so many possibilities!

selection of blue fabrics


Then came the emails from Fabric.com. Hmm, let's see what they have in clearance. A few fat quarter bundles, a nice patriotic print, and a useful blue, yellow, and brown.

patriotic, blue, and yellow fabrics


A visit to Santa Cruz prompted a trip to the only Beverly's in the area - I so miss the store in San Jose! There I found a pretty blue for an upcoming project, and the black/white paw print for dog quilt I plan to make for my son.

dog fabrics

Can't remember where the other two fabrics came from, though they are set aside for the dog quilt.

Last, but not least, a ton of Valentine 1 yard cuts from JoAnn. They have such pretty heart prints this year - I couldn't resist!

valentine fabrics in red and pink


valentine fabrics in black, red and pink


Though I purchased a lot, I think I found some great fabrics to add to the stash - don't you agree? Unfortunately, that makes the stats for 2020 worse than 2019, with 88 out and 151 in.

2020 ratio
 2 yards out / 3.4 yards in

This year is starting out with 19 in, and none out at the moment, which should change soon. I need to get back to discipline to keep that ratio or make it better - wish me luck!

Happy Quilting!


Follow on Bloglovin

My Favorite Patterns

Friday, July 10, 2020

Quilting and Covid-19

Today's post is a bit unusual for me, as it's not full of pretty quilts or a helpful tutorial. Instead, I'm pulling out my crystal ball to view the state of quilting, or any business for that matter, during the Covid-19 pandemic.

crystal ball surrounded by hands


So here we are, 4 months after my county became the first to issue stay-at-home orders, shuttering businesses and laying off workers. The immediate impact was astonishing, with long, masked and social distanced lines of people attempting to acquire basics necessities to live. And yes, there were shortages, some of which have recovered, and some that have still not. 

So what's this have to do with quilting? Many quilters turned into mini factories, making masks for those who had none. Some, with new found time on their hands, dusted off the sewing machine and are learning to quilt. From my fellow bloggers, many find this a chance to finish those UFO's, start projects that have been held in waiting, and use up what's in our extensive fabric stashes.

But eventually, we're going to run out of fabric, thread, batting, etc. Really? Is that possible? We've already seen it with elastic for masks becoming a scarce commodity. So, yes, there will come a time when there's not enough of some supply to finish a quilt, and we'll need to go shopping.

Which brings me to: Have you been to you're local quilt shop or fabric store lately? I visited JoAnn's two weeks ago in search of a few greens. And this is what I saw: 

half empty fabric aisle in JoAnn fabrics in June 2020


another half empty fabric aisle in JoAnn fabrics

a lot of empty shelves, and bolts still in plastic wrap. I'm not sure if the plastic was due to lessening contamination, or if there just wasn't enough staff to unwrap them. Visits to other quilt shops, or any store for that matter, reveal their shelves are also becoming bare, with expected orders delayed. It is a disheartening site.

Now, if we think about this, country-wide shutdowns happened in March. Which means manufacturing of new goods was halted, as were deliveries. Stores that were allowed to stay open used or sold what they had in stock. If they received ANY new stock, it was most likely from what was held in a warehouse.

With no or curtailed manufacturing, the warehouses are now becoming depleted. This affects not just the quilting industry, but many others as medical supplies are once again becoming scarce. Manufacturing has not fully ramped up in order to restock the warehouses. 

Which brings me to: Have you tried to order fabric (or anything) online? I have, and have been met with 'out of stock - provide your email and we'll let you know when it's back in', to 'out of stock - expected delivery mid-August'. With shut downs happening again, who knows if and when deliveries will happen. A massive snowball is just starting to form: if there's no manufacturing, there's no deliveries, translating to no sales, and worst case, more out-of-business signs.

The supply chain is not looking good, and I'm concerned about what we're going to see 6 months to year from now, not only in the quilting industry, but other goods too. I truly hope it does not get worse, and that our country can get back to work, and our economy humming again. 

As quilters, we'll make do with what we have, as is the history of quilting. And if we have to return that UFO to the pile, then so be it. It will get finished eventually. As for new projects, who knows?

I'm sorry for the distressing view from my crystal ball. A year from now, I want to look back at this post and say that my prediction was wrong, along with a more positive, uplifting view of the future. But the way things are headed, my prediction just may become reality - consider this a heads up. And if it does, we will find a way to cope, as humans have done for thousands of years, in even more dire circumstances than now. 

We will get through this.


Monday, May 4, 2020

Stay at Home Round Robin Quilts

Yay! Two new finishes to show! Both of these quilts are from the Stay at Home Round Robin quilting diversion, hosted by Gail of Quilting Gail. The event has now wrapped up, and it's time to show my creations!

First up, is Fiesta Garden,


Fiesta Garden by QuiltFabrication

adding quite the pretty punch to this area of my garden. Both hubby and I are quite pleased with how this turned out. His begging me to stop after the pinwheel round was a good decision. This wall hanging finishes at 39" x 39", a perfect size.

As for the quilting, nothing was pre-planned. I started with the pinwheels, keeping things simple, but knowing I wanted leaves in the green areas, 


Fiesta Garden quilting by QuiltFabrication


and some way to represent water in the blue center. I consider that area a pond, with water spraying from the center. Therefore, pond ripples.


Fiesta Garden quilting closeup by QuiltFabrication


I also muted the glaring white around the pond by quilting a dense yellow stipple - worked like a charm! We consider that a sandy walkway around the pond.


Fiesta Garden quilt full on by QuiltFabrication


Now for the second quilt, The Moon and the Stars.


The Moon and the Stars by QuiltFabrication


This was started half-way through the event, and also used pieces leftover from other quilts. With lots of star fabric to choose from, it was my main focus for two days so that hubby wouldn't put the breaks on it too. This quilt has all of the rounds, and measures 44" x 44".

Quilting on The Moon and the Stars is a star pantograph,


The Moon and the Stars quilting by QuiltFabrication

and even the back is full of stars.


The Moon and the Stars quilting and backing by QuiltFabrication

Some child will be over the moon and the stars to snuggle with this one!

Just want to say thank you again to Gail for hosting this round robin event - I had a lot of fun!

Happy Quilting!


Follow on Bloglovin
Thanks for following!

Friday, April 24, 2020

Curly Quilt Fill

In my joy of sharing my mouth watering Chocolate Dipped Strawberries early this month, I completely forgot to talk about the quilting, especially the curly quilt fill used in the background.


Curly Quilt Fill on the Chocolate Dipped Strawberries runner by QuiltFabrication

Isn't it sweet? How about adorable? Cute? Charming? Delightful? Downright lovely? However it's described, the curly quilt fill is easy to stitch, whether using a longarm or a domestic sewing machine - let's see how!

First, some drawings. Start near a seam or an edge, working outward with a circle that curls into the center. Let the curl move inside the circle just enough without overdoing it. Too much, and it becomes a spiral.


right and wrong curl length for the curly quilt fill

Backtrack over the curl to a spot to start the next the curl, which curls in the opposite direction. Think of ram's horns when doing this.


backtrack and start a new curl in the opposite direction


Keep making curls to fill in the area, backtracking either a little or a lot to get to the desired area. 


curly quilt fill drawn out to fill the area

Some areas really take on the ram horns idea, while other areas are more linear. The backtracking decides where the next curl will start. Let's see this curly quilt fill stitched out.


The size of the curls can also change for different looks, like on Ladybug Dance.


varying curl sizes on Ladybug Dance by QuiltFabrication

or stay a consistent size as in the background fill in Chocolate Dipped Strawberries.

consistent size curly fill on Chocolate Dipped Strawberries

It's totally up to the quilter and the quilt as to which one works better. Either way, that curly fill will be sweet, adorable, cute, charming, delightful, or downright lovely - you choose how to best describe it!

Happy Quilting!


Thank you for following!
Follow on Bloglovin

Monday, April 20, 2020

Freezer Paper Template Piecing

Last week, I covered foundation paper piecing, and this week is devoted to Freezer Paper Template Piecing. 


freezer paper template piecing tutorial

Both techniques are well covered in the Handy Pocket Guide to Paper Piecing by Tacha Bruecher (affiliate link), concise little book, full of useful tips and fun blocks to make. Plus it doesn't take up a ton of room on the shelf!

Handy Pocket Guide to Paper Piecing by Tacha Bruecher


There are a few important tips to keep in mind before starting with freezer paper template piecing:
  • print an extra copy of the pattern as a guide
  • mark ALL seam lines with tick marks for matching before cutting the pattern apart for templates
marks for matching on all seams

  • work one area at a time to avoid mixing up pieces

Another tip I've learned over the years is to iron two pieces of freezer paper together before making templates, as the freezer paper can shrink a bit. It's totally up to the quilter to do this or not. I, personally, did not do this for my Chocolate Dipped Strawberries project, and the berries turned out fine. So let's see how to freezer paper template piece!


Freezer Paper Template Piecing

First, print or draw the pattern onto the dull side of freezer paper. Make matching marks on ALL of the seam lines, then, using a rotary blade for paper, cut the pattern apart on the seam lines. Leave the seam allowance lines at the block edges intact.
freezer paper templates for freezer paper template piecing
Iron the freezer paper templates to the wrong side of the fabric. Cut out the fabric pieces, adding 1/4" seam allowances around all edges of the templates, keeping the templates on the fabric.

If the seam allowances at the block edges get cut off, just add a mark as a reminder to add more fabric in that area. In the picture below, I made an X because the paper seam allowance at the block edge is missing. That X is my note to add a bit more seam allowance (maybe even more than shown!) to that edge. 


1/4 inch seam allowance around templates with more for block edges

Using the marks made on the seam lines, line up the pieces with seam allowances even, and push pins through at the marks, keeping the pins straight up and down.


aligning template pieces at marks

Here's what the unit looks like from the back, with pins at both marks.


pins at seam marks for matching and alignment


With another set of pins, pin the pieces together, straight in from the edge of the seam allowance so as not to cause a shift. Then stitch as close as possible next to the template edge.


stitching next to template edges in freezer paper template piecing


When joining large pieces or units, I recommend taking 5-8 basting stitches, 4.0-5.o in length, to check the accuracy of the match/alignment. Because these pieces are not very big, I stitched all the way across with a 1.8-2.0 stitch length, starting and stopping at the outer edge of the seam allowance.


stitched seam in freezer paper template piecing


Looks good on the front, with a slight bit of stitching away from the template at the top. If that happens, either restitch the seam, or move the freezer paper template making sure it's still aligned with the other piece.

Make a thorough check of the back too, as it's easy to sew through the freezer paper, or be far away from the template. The backside below looks good enough for me. And accepting that may be my downfall - keep reading!


backside of seam to check sewing accuracy


Open up and lay the pieces flat for one last check of alignment. Time to press that seam.


freezer paper template piecing seam as seen from the top


With freezer paper templates, there are two options for seam pressing, either as a personal choice, or a project necessity. The seams can be pressed open, eliminating seam bulk and creating a flat block, OR pressed to one side, as in normal piecing. Before choosing, examine the block and decide which pressing option is best for the block to eliminate fabric buildup. 

Since I was testing both foundation paper piecing and freezer paper template piecing on my strawberries, I chose to the press the seams open with the template method. That's shown on the berry on the left, with the foundation pieced berry on the right.


freezer paper template pieced open pressed seams on left, foundation paper pieced on the right

I liked the nice, flat block from open seams, and hubby liked the seams to one side of foundation piecing, thinking it gave the berry more dimension. Ultimately, the decision depends on block complexity and personal preference. Below, the freezer paper template pieced/open seams berry, 


freezer paper template pieced/open seams berry

and the foundation paper pieced/seams to one side berry.


foundation paper pieced/seams to one side


Not a huge difference between the two, but I did notice an increase in block length using freezer paper templates and open seams. My guess is that my stitching wasn't close enough to the template edge, causing the unit to grow - that acceptance bit me! Add to that the few threads of fabric that weren't taken being taken up in pressing to one side. The two together stretched out the freezer paper template berry, causing a wider tip after cutting to fit the block dimensions. 


freezer paper template pieced/open seams strawberry


The second berry is accurate because of stitching though drawn lines of foundation paper piecing. 


foundation paper pieced/one direction seams strawberry


I also noticied that the stitch-in-the-ditch quilting practically disappeared into the open seams of the template pieced berry. Not that big of a deal as it's hard to see, but I noticed it when laying down those stitches and found it odd.


Pros and Cons of freezer paper template piecing


Pros
  • no paper to tear out 
  • open seam pressing is an option
  • templates help stabilize slippery fabrics
  • templates are pressed to the wrong side of the fabric for a mirror image block of the printed copy. The basic technique can be used on the right side of fabrics such as for Cynthia England's Picture Piecing technique

Cons
  • requires accurate cutting around templates
  • one section worked at a time to avoid mixing up pieces
  • requires accurate stitching along template edges or units may grow in size
  • seams may need resewing due to misalignment
  • templates may fall off 


Freezer paper template piecing may be tricky but isn't hard, and it certainly has it's place in the quilter's toolbox. I personally found it a bit more labor intensive than foundation piecing, with a decrease in accuracy. But it all depends upon the project as to which method is more suitable. Give both a try, and see which is your favorite!

Happy Quilting!


Follow on Bloglovin
