Showing posts with label sewing room. Show all posts

Friday, June 5, 2020

DIY Sewing Table

With everyone rediscovering sewing right now, this former post on my DIY sewing table made from an Ikea Ingo table, is just as timely now as it was when first posted in 2013. With a few extra nuts, bolts, and wood plus the necessary tools, the instructions below make it an inexpensive and easy way to have a sewing machine seated in a table, making the bed flush with the table surface - every quilter's dream!

Ikea Ingo table for a sewing machine

The original source for the sewing table construction was from a site called From Marta With Love, but with added tweaks and additions along the way. Follow along for instructions to make an inexpensive sewing table, complete with knee lift!

Supplies

  • Ikea Ingo table or other table with edge support rails under the top
  • 3/4" plywood support board, 2" wider and longer than the sewing machine
  • a 2x2, at least 56" long
  • jigsaw
  • miter or hand saw
  • jig kit
  • medium grit sandpaper 
  • drill with a 1/4" bit and a countersink bit
  • clamps
  • (4)  1 1/4" wood screws
  • (4) 4" long 1/4" diameter bolts with threads at least halfway up the bolt
  • (8) washers and nuts to fit the bolts
  • (4) bolt caps


Placement and Cutting

Assemble the Ikea Ingo table, but don't fully attach the table top. 


Ikea Ingo table unfinished

Measure in from the table top edge to the support rails at both the front and the right side. Add the width of the support rails to this measurement. Transfer these measurements to the front right corner of the table top, again from the edge, with several small marks. Also mark where the bracket attaches. These marks will help in machine placement, preventing rail interference.


Place the sewing machine on the table top, avoiding the rail marks. There are no hard and fast rules for sewing machine placement - it's more of a personal preference of what's a comfortable sewing distance. For my table, I marked my Janome 6500 footprint at 3" from the front and 3 5/8" from the right side, leaving 24 3/4" on the left. I want as much room as possible on my left!

Ikea Ingo table showing sewing machine ledge

Note: If you do slide the machine far to the right, the added right support rail underneath will have to be modified as it will probably hit the corner bracket. Do this only if you are comfortable making adjustments to that rail. We made the rail shorter (see the open space in the corner above), then added a third support rail along the back of the opening, putting two bolts there, and only one on the right side. All total, we used five bolts to support the machine.


Once positioning is determined, trace around the footprint of the sewing machine, making sure to leave enough space to accommodate the cords. My 'opening' is approximately 1/4" bigger than my machine, which also helps getting the machine in and out.


sewing machine tracing and hole cutting


Remove the table top from the legs, placing it on a supporting surface to cut the hole. Drill a large starter hole inside the tracing, near an edge for easy insertion of the jigsaw blade. Then cut, using a wood blade, carefully following the drawn line and going slowly around any curves.

After cutting, check the machine's fit in the hole and make any adjustments. Sand the edges, and use wood filler if necessary on any mistakes or wood chips. Reassemble the table, but don't tighten anything yet.

Supports

Flip the table onto it's top, with legs in the air. Measure between the front and back rails - for the Ikea Ingo table, it should be 26". Cut the 2x2 at this measurement for 2 pieces.

On the back of the table top, measure 2" over from each short side of the hole, marking a line from the front rail to the back rail. These are guides for attaching the 2x2x26 pieces.


support rail placement and bolt placement for the sewing table


Using a jig kit, drill 4 pocket holes (one on each end of each 2x2x26) for the 1 1/4" wood screws.

drilled pocket holes

Place the outer edge of these pieces on the drawn lines (they are placed between the hole and the line) and screw in place to the rails. 

Mark the bolt positions on the new support rails, approximately 1" down from each long hole edge, avoiding the wood screws on the ends. (Refer to drawing above).

Remove the table top from the table frame, and legs still in the air, drill 1/4" holes all the way through the 2x2's. Flip the table frame over, and countersink the tops of the holes. Test that the bolts fit in the holes, and that they don't stick out on top. 

Remove the bolts, and turn the table frame over again. Place the 3/4" plywood support board under the frame, centering it within the hole/bolt/support framework, with equal amounts of overhang. Using the drilled holes as a guide, drill small pilot holes into the support board - don't drill all the way through! Remove the support board and continue drilling the holes through the board.

Assembly

Place the table on it's legs, and put the bolts through the holes, checking again that they are countersunk enough. Place the table top on top, and reattach the top to the frame per the Ikea instructions. The bolts should be hanging through the support rails.

Attach the 3/4" plywood support board underneath, using the following hardware sequence:

                   nut  --  washer  --  SHELF  --  washer  --  nut

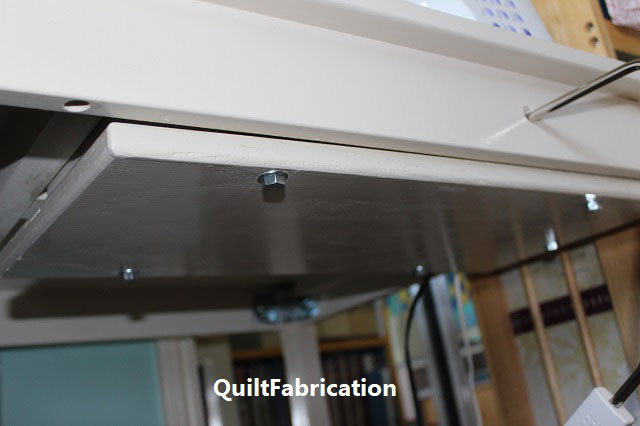
Ikea Ingo sewing table with knee lift hole


Tighten both nuts, and use them to adjust for level of the support board after inserting the sewing machine. Tighten/loosen until the machine bed is level with the table. When all's good, add the bolt covers to lessen injuries. Bring the cords up through the hole, attach, and done!

DIY Ikea sewing machine table


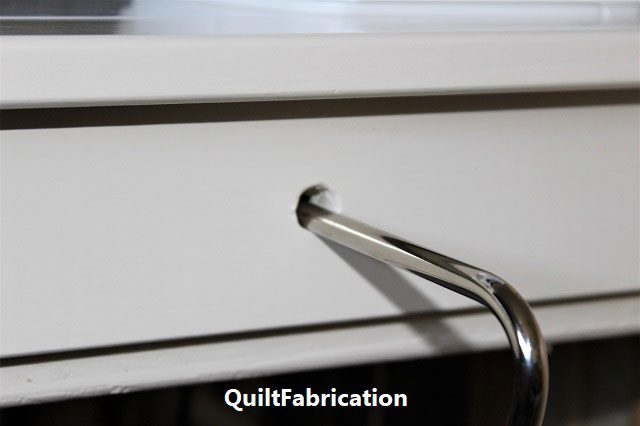
To make this extra special, drill a hole for a knee lift.

DIY Ikea sewing table knee lift hole


Unfortunately, I can't tell the exact spot for that, but I recommend measuring from different areas on both the machine and the table to determine where the knee lift hole is. Then drill a 5/8" hole, bigger than needed, in the front support rail to insert the knee lift bar.

DIY Ikea sewing table with knee lift hole


And for added table stability, since sewing machines produce a lot of vibration, use a few more 2x2's as support bars between the legs. Check them out in the picture below.

DIY Ikea Ingo sewing table with extra leg support


So with a bit of extra wood and some time, I've now got myself a sewing table with a set in machine, for under $125.  Awesome! 

Happy Quilting!


Follow on Bloglovin

My Favorite Patterns

Monday, January 6, 2020

Studio Update

Over the holidays, the studio got an update!


QuiltFabrication studio update


First change - removing the wallpaper, which can be seen peeking out from between the quilts on the walls.


old QuiltFabrication studio
Dating from the early 90's, it was time for it to go. Fortunately, with only 3 half walls to do, it only required a day to remove/clean, another day for paint primer, and one more day for the final paint. After much debate, we chose Behr's Minimalistic, a cool white, for the top portion of the wall and left the green on the bottom. 

I also gave a new home to our old torchiere light, which helps increase the light on the quilt frame. Notice that none of the quilts have returned to the wall? 

bare walls of QuiltFabrication studio

At the moment, I plan to keep it that way, because the room has an uncluttered feel, like a blank slate for new creative ideas.

Continuing around the room, the next area up for reorganization was the storage in the corner. 


old QuiltFabrication storage corner


This area drove me nuts, with makeshift shelving of 2x4's and flat boards, plus a lot of stuff piled on the top and on the floor. In the circled area in front of the drawer unit, you can just barely see the home of my collection of Glide thread in various sized bins. 


Glide thread

Not only did it take of precious floor space, but it made for an awful view down the hall from the living room. In my eagerness to get to work on the redo, I forgot to take a picture of that scene! Anyway, that corner was just ugly.

After spending a few weeks shopping for storage, I decided on Ikea's Stuva system, which is part of their kid's collection of furniture but perfect for what I want. I decided on one tall unit, around 75", which has a cabinet on top, and next to it, the shorter, 50" unit, all full of drawers. 


Ikea Stuva system cabinets

These are both bolted to the wall, because with this height, tipping over would be disastrous. Having the shorter unit doesn't overwhelm the space, and it could serve as a counter, though I've made a pledge not to dump stuff there. And the view from the door/hall/living room? Awesome and uncluttered!


Ikea Stuva system cabinets side view

The best part about these units? The thread storage bins fit side by side in the cabinet.


thread storage in Ikea Stuva cabinet

With the purchase of a few more bins, my thread is now organized by color family, and behind closed doors free of dust and sunlight. Having the thread up there makes me incredibly happy, even more so than all the awesome fabric storage!

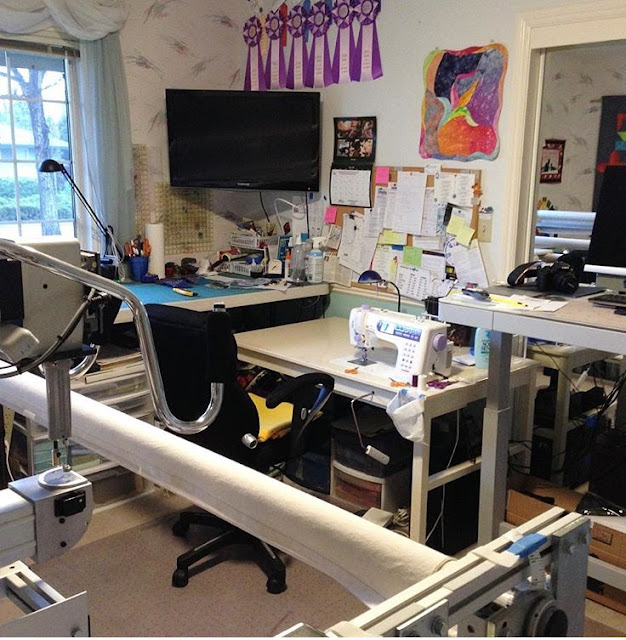
The last area and the most challenging, is the cutting table, which sits perpendicular to my sewing table. Here's the old,


QuiltFabrication old sewing and cutting table area

and the new. 


QuiltFabrication new sewing and cutting table area

Yup, all that's changed is the wallpaper to paint, and only the cork board comes back to the wall.

Why no big change? Well, there's a few issues. The cutting table is a 6' folding table, with plastic storage units underneath. There's at least 8" of unusable space underneath because of the brackets of the table, which I'd love to take better advantage of, along with the space on the right that's hidden by the sewing table.

Hubby's idea was a kitchen cabinet of drawers on the left, and a shelf unit on the right. But I'm not too happy about that because the permanency of low cabinets bolted to the wall, and the difficulty of getting to the storage on the right because of the sewing table legs. Plus, we'd have to manufacture a top, as my search for a pre-made one that's 30" x 72" has come up blank. Ikea, why can't you make one that size???

So, for now I'm going to leave the area as it is, with changes of what's stored there. That's the 'don't use often' spot that everyone has somewhere in their house. And it's still somewhat accessible, even though I have to contort myself to get back there.

Overall, I'm very happy with the changes, especially those Ikea Stuva cabinets which make everything nice and neat. Thank you for coming on my studio update tour - now I need to get to creating!

Happy Quilting!


Follow on Bloglovin

Thanks for following!

Friday, April 19, 2019

Fabric Storage

Now that both kids are gone from the house, very little of their stuff remains - woohoo! To not wade through clothes, shoes, and other stuff scattered on the floor and chairs throughout two rooms is heaven!

And in the process of cleaning out, several under bed boxes were freed up, one of which I quickly laid claim to for a growing stash of gray fabrics.


gray fabric bin

What is this particular box? It's a clear Sterilite under bed box, 6 1/2" tall, with square corners and a latching lid system. These are found where storage supplies are sold, for around $8.


Steirlite under bed box

The other boxes had curved ends, no locking handles, and where a bit smaller, not good candidates for fabric storage.

So, why do I like these boxes so much? For me, they are the perfect way to store fabric! Here's 7 reasons why these under bed boxes are great for fabric:

1.  clear, so you can see what's in it

2.  keeps fabric organized, by theme or color

3.  big enough to store several yards of fabric, but won't become so heavy that it's impossible to lift or move

4.  allows fabric to be stored out of sunlight, which can cause huge damage to a stash

5.  latching covers cuts down on dust collection

6.  easily stacks - I have 4 groups stacked with 3 or more

7.  when properly folded, fabric is stored on edge, meaning it doesn't get crushed by the weight of other pieces on top. This also makes each piece easily visible, like going through a file folder. 

So, just what is properly folded fabric? Fabric that is folded to have a 6" dimension on one edge. Since I buy mostly 1 yard cuts, I'll show that one first, followed by larger cuts.

Fold the 1 yard in half, fold to fold, and selvage to selvage.


1 yard of fabric folded in half

As the fold lines show, fold on a third,


1 yard of fabric folded in one third

then a third again.


1 yard of fabric folded on a second third

Fold in the opposite direction by a third,


1 yard of fabric folded on a third in opposite direction

and once again, which is the final fold.


1 yard of fabric folded on a second third

This piece measures approximately 8" wide by up to 6" tall, a perfect height for the box.

A 2 yard (or more) cut is handled a bit differently, just because there's so much fabric to fold. Start again by folding the 2 yards into a piece approximately a half yard tall.


2 plus yards folded to a half yard size

Instead of thirds, fold it in half,


2 plus yards folded in half again

then in half again in the opposite direction.


2 plus yards folded in half again in the opposite direction

And fold once more, in the opposite direction, which is the final fold.


2 plus yards folded in half again in the opposite direction

This piece is a bit wider, around 10", but the height comes in around 6", again a perfect height for the box. Here's the two pieces, end to end, showing they're equal in height for the box.


1 yard and 2 yard fabric cuts folded for a six inch edge

And now they go into the box, on edge, easily seen, accessible, dust-free, not crushed by weight, etc, etc. The two pieces folded for the demo can be seen at the white arrows.


1 yard and 2 yard fabric cuts placed in the box

Now, not only am I happy with a de-cluttered house, but all of my grays are together, not in several shoe boxes, a drawer, or mixed in with the black/whites - hooray! Hmm, looks like I have a bit more room in this one, don't you think??

Happy Quilting this weekend!


Follow on Bloglovin

Thursday, March 10, 2016

Removing Wrinkles

Today, it's about removing wrinkles. Everyone, at some point in their life, has to deal with them. I wish there was a miracle cure, but alas, no.


The best solution I've found is a damp towel and 5-10 minutes in the dryer.

Huh? So sorry but this isn't about how to remove those wrinkles that mar the beauty of our faces. Instead, it's softening up those hard fold lines in batting!

Today, I'm using a 100% cotton packaged batt that has sat on a shelf with other items piled on top of it. You get the idea of how heavy the fold creases are. Silly me, didn't take a picture!

So, off to the dryer, with a damp hand sized towel thrown in. Set on high heat, the two tumbled for 5-10 minutes. Upon removal, a warm, smooth, soft batt filled my arms! Immediately spreading the batt out to avoid setting in cooling wrinkles, she now looks like this:


Faint creases are all that remain of the folds. 

Now, I have to admit, I do this same technique on my husband's shirts. Usually, I leave them in too long and they get all wrinkled. Throw them back in with a damp towel for a few minutes, and I've just saved myself precious ironing time. Really, who likes to iron shirts??? (Oh, wait, my mother loves to iron sheets! Yes, sheets.)

So the next time you've got a wrinkled batt, give this a try - I'm sure you'll be thrilled with the results!

Happy Quilting!


Thursday, February 25, 2016

Be Good to Yourself!

Yes, we all need to start being good to ourselves. I'm not talking about a day at the spa, a reward of chocolate, or a quilters favorite, Fabric Acquisition Road Trip (FART for short). I'm talking about being good to our bodies.


That is, having the correct posture not just when sewing, but all the time. Recently I saw a news article about iHunch and how our phones are ruining not only our posture but our mood. And it made me take notice!

Over the past year, I've become very conscious of my posture, especially my shoulders rolling in. I attribute it to several things: age; constantly being cold, which makes me hold my arms across my torso to stay warm; and sleeping on my side, which is more on the back of my shoulder than on my arm. One would think I wouldn't have this problem because I swim, which uses a lot of arm, shoulder, and chest muscles, but alas, I do.

After spending the afternoon yesterday at the longarm, and reminding myself to stand up straight, I felt that good posture really needs to be addressed. I've seen too many young longarm quilters hunched over their frame, and it scares me to think what their backs are going to look like in twenty years. 

So for you longarm quilters, stand up straight and relax those shoulders. Please don't hunch over and hang on the machine handles. There's a great post at archaicarcane.com for frame height and other body position suggestions. Well worth reading.

And what about sit down quilting? We've all been told to have good posture when sitting at a sewing machine. But do we do it? Referring to the picture above, see if that's you. Adjust your table if necessary, and get yourself into the proper position before sewing to achieve that, and make it a habit. For me, that's sitting up, relaxing my shoulders (do not hold them up by your ears!), and resisting the urge to bend forward.

I've found a great resource for practicing great posture all day, Handy Tips for the Perfect Posture. It's something that we all need to practice, and be conscious of, because we want our bodies to be pain free. So I keep reminding myself to sit/stand up straight, shoulders back, and avoid bending my head too much look at my phone or my work on the longarm. And yes, I try not curl in my arm while on my side at night - tough, but at least I'm aware of it.  

So please, sit and stand up straight! You'll thank yourself later. 


Friday, July 19, 2013

My DIY Sewing Table

Updated 6-2020

So excited to share my DIY sewing table! Using an Ikea Ingo table, a few extra nuts, bolts, and wood plus the necessary tools, the instructions below made it an inexpensive and easy way to have a sewing machine seated in a table, making the bed flush with the table surface - every quilters dream! 

Ikea Ingo table for a sewing machine

The original source for the sewing table construction was from a site called From Marta With Love, but with added tweaks and additions along the way. Follow along for instructions to make an inexpensive sewing table, complete with knee lift!

Supplies

  • Ikea Ingo table or other table with edge support rails under the top
  • 3/4" plywood support board, 2" wider and longer than the sewing machine
  • a 2x2, at least 56" long
  • jigsaw
  • miter or hand saw
  • jig kit
  • medium grit sandpaper 
  • drill with a 1/4" bit and a countersink bit
  • clamps
  • (4)  1 1/4" wood screws
  • (4) 4" long 1/4" diameter bolts with threads at least halfway up the bolt
  • (8) washers and nuts to fit the bolts
  • (4) bolt caps


Placement and Cutting

Assemble the Ikea Ingo table, but don't fully attach the table top. 


Ikea Ingo table unfinished

Measure in from the table top edge to the support rails at both the front and the right side. Add the width of the support rails to this measurement. Transfer these measurements to the front right corner of the table top, again from the edge, with several small marks. Also mark where the bracket attaches. These marks will help in machine placement, preventing rail interference.


Place the sewing machine on the table top, avoiding the rail marks. There are no hard and fast rules for sewing machine placement - it's more of a personal preference of what's a comfortable sewing distance. For my table, I marked my Janome 6500 footprint at 3" from the front and 3 5/8" from the right side, leaving 24 3/4" on the left. I want as much room as possible on my left!

Ikea Ingo table showing sewing machine ledge

Note: If you do slide the machine far to the right, the added right support rail underneath will have to be modified as it will probably hit the corner bracket. Do this only if you are comfortable making adjustments to that rail. We made the rail shorter (see the open space in the corner above), then added a third support rail along the back of the opening, putting two bolts there, and only one on the right side. All total, we used five bolts to support the machine.


Once positioning is determined, trace around the footprint of the sewing machine, making sure to leave enough space to accommodate the cords. My 'opening' is approximately 1/4" bigger than my machine, which also helps getting the machine in and out.


sewing machine tracing and hole cutting


Remove the table top from the legs, placing it on a supporting surface to cut the hole. Drill a large starter hole inside the tracing, near an edge for easy insertion of the jigsaw blade. Then cut, using a wood blade, carefully following the drawn line and going slowly around any curves.

After cutting, check the machine's fit in the hole and make any adjustments. Sand the edges, and use wood filler if necessary on any mistakes or wood chips. Reassemble the table, but don't tighten anything yet.

Supports

Flip the table onto it's top, with legs in the air. Measure between the front and back rails - for the Ikea Ingo table, it should be 26". Cut the 2x2 at this measurement for 2 pieces.

On the back of the table top, measure 2" over from each short side of the hole, marking a line from the front rail to the back rail. These are guides for attaching the 2x2x26 pieces.


support rail placement and bolt placement for the sewing table


Using a jig kit, drill 4 pocket holes (one on each end of each 2x2x26) for the 1 1/4" wood screws.

drilled pocket holes

Place the outer edge of these pieces on the drawn lines (they are placed between the hole and the line) and screw in place to the rails. 

Mark the bolt positions on the new support rails, approximately 1" down from each long hole edge, avoiding the wood screws on the ends. (Refer to drawing above).

Remove the table top from the table frame, and legs still in the air, drill 1/4" holes all the way through the 2x2's. Flip the table frame over, and countersink the tops of the holes. Test that the bolts fit in the holes, and that they don't stick out on top. 

Remove the bolts, and turn the table frame over again. Place the 3/4" plywood support board under the frame, centering it within the hole/bolt/support framework, with equal amounts of overhang. Using the drilled holes as a guide, drill small pilot holes into the support board - don't drill all the way through! Remove the support board and continue drilling the holes through the board.

Assembly

Place the table on it's legs, and put the bolts through the holes, checking again that they are countersunk enough. Place the table top on top, and reattach the top to the frame per the Ikea instructions. The bolts should be hanging through the support rails.

Attach the 3/4" plywood support board underneath, using the following hardware sequence:

                   nut  --  washer  --  SHELF  --  washer  --  nut

Ikea Ingo sewing table with knee lift hole


Tighten both nuts, and use them to adjust for level of the support board after inserting the sewing machine. Tighten/loosen until the machine bed is level with the table. When all's good, add the bolt covers to lessen injuries. Bring the cords up through the hole, attach, and done!

DIY Ikea sewing machine table


To make this extra special, drill a hole for a knee lift.

DIY Ikea sewing table knee lift hole


Unfortunately, I can't tell the exact spot for that, but I recommend measuring from different areas on both the machine and the table to determine where the knee lift hole is. Then drill a 5/8" hole, bigger than needed, in the front support rail to insert the knee lift bar.

DIY Ikea sewing table with knee lift hole


And for added table stability, since sewing machines produce a lot of vibration, use a few more 2x2's as support bars between the legs. Check them out in the picture below.

DIY Ikea Ingo sewing table with extra leg support


So with a bit of extra wood and some time, I've now got myself a sewing table with a set in machine, for under $125.  Awesome! 

Happy Quilting!


 Follow on Bloglovin