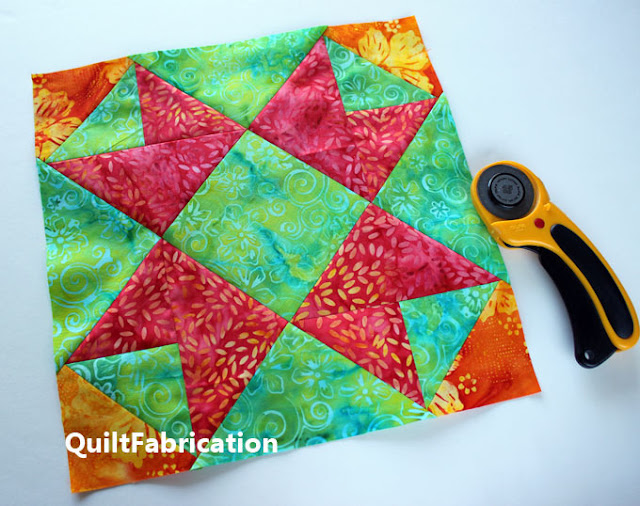
Are you sewing along with Electric Quilt's Block Base+? It's time to share the second block, #2898, also know as Magic Cross.
EQ's post featuring this block came out April 12, giving us eleven days to stitch it for sharing on the EQ linky party today. In case you want to join in, block 1 is #1273, and block 3 will come out on Monday, April 26. That's one block every two weeks until mid-July, for a total of eight blocks.
Keep in mind that EQ's post is all about using the features of their new Block Base+ program (no affiliation), which can be a stand-alone program, or linked to EQ7 or 8. It's a great program - I especially like the quilt layout previews!
Because all EQ blocks come with no instructions for construction, I thought I'd provide a little tutorial on cutting and assembling #2898 for a finished 12" block size. Ready?
Here's block 2898 in it's original EQ coloring,
and recolored to match my actual block and avoid confusion in the tutorial.
Here's block 2898 broken down into labelled parts, and I'll refer to the above coloring in the tutorial to match my block. I'm also showing all parts at once, which may seem confusing, but it makes it easier to see how the construction is completed.
Cutting for a 12" finished block
for A: 2 squares 3 7/8" background (green)
2 squares 3 7/8" yellow
2 squares 3 7/8" red, cut on the diagonal for 4 triangles
for B: 1 square 7 1/4" background (green), cut on both diagonals for 4 triangles
1 square 7 1/4" red, cut on both diagonals for 4 triangles
for C: 1 square 4 3/4" background (green)
Make Corner Half Square Triangles (HST's)
This is basic quilting 101, but I'll include it anyway.
Draw a diagonal line on each of the 2 yellow 'A' squares. Pair with 2 green 'A' squares. Stitch a scant 1/4" from the line to make a total of 4 yellow/green HST's.
Press seams, and trim HST's to 3 1/2" square. As independent HST's, they're seen in the upper and lower left corners in this picture.
By laying out all pieces with jumped ahead construction, you can also get an idea of how this block is going to be put together. To follow along, it's easiest to lay out all the pieces in the correct positions.
Once those corner HST's are made, the next step is to add the red triangle piece 'A' to side of the of each green triangle of the yellow/green HST. The piece is seen independently in the upper left, and sewn in at the other corners.
Next, add red triangles 'B' to the red and green of the previous unit.
You can see where the construction is going in the above photo. I'm making two corner triangular units and a center diagonal strip for the easy piecing.
To make those two corner triangular units, add two green 'B' triangles, shown with the circles, on each side of the red triangles. And stitch the remaining corner units to the green center square 'C' to make the center diagonal strip.
To finish, add the corner triangle units to the diagonal center strip, matching seams.
And there is block #2898 completed, at an unfinished measurement of 12.5" x 12.5". Easy, right?
Sew along with the EQ group or make more 2898 blocks for an entire quilt - have fun!

My Favorite Patterns


good demo! I got Block Base recently and forgot they had a follow along - I do not have EQ though
ReplyDeleteGreat instructions! I was wondering how that block was made. It's a very interesting one. Thanks.
ReplyDeleteFun block - and love the colors you chose!
ReplyDeleteA very pretty block. I don't work with batiks much but do you find they do better for all that bias (triangle) sewing? You caught me there at your last sentence--at first glance, I thought you were saying to make 2,898 more blocks. LOL. (Gee, you must REALLY love those blocks!)
ReplyDeleteThanks for linking up with To-Do!
ReplyDeleteThank you for sharing, looks beautiful.
ReplyDeleteHow did you get the cutting measurements instead of using templates?