Showing posts with label free motion quilting. Show all posts

Friday, April 24, 2020

Curly Quilt Fill

In my joy of sharing my mouth watering Chocolate Dipped Strawberries early this month, I completely forgot to talk about the quilting, especially the curly quilt fill used in the background.


Curly Quilt Fill on the Chocolate Dipped Strawberries runner by QuiltFabrication

Isn't it sweet? How about adorable? Cute? Charming? Delightful? Downright lovely? However it's described, the curly quilt fill is easy to stitch, whether using a longarm or a domestic sewing machine - let's see how!

First, some drawings. Start near a seam or an edge, working outward with a circle that curls into the center. Let the curl move inside the circle just enough without overdoing it. Too much, and it becomes a spiral.


right and wrong curl length for the curly quilt fill

Backtrack over the curl to a spot to start the next the curl, which curls in the opposite direction. Think of ram's horns when doing this.


backtrack and start a new curl in the opposite direction


Keep making curls to fill in the area, backtracking either a little or a lot to get to the desired area. 


curly quilt fill drawn out to fill the area

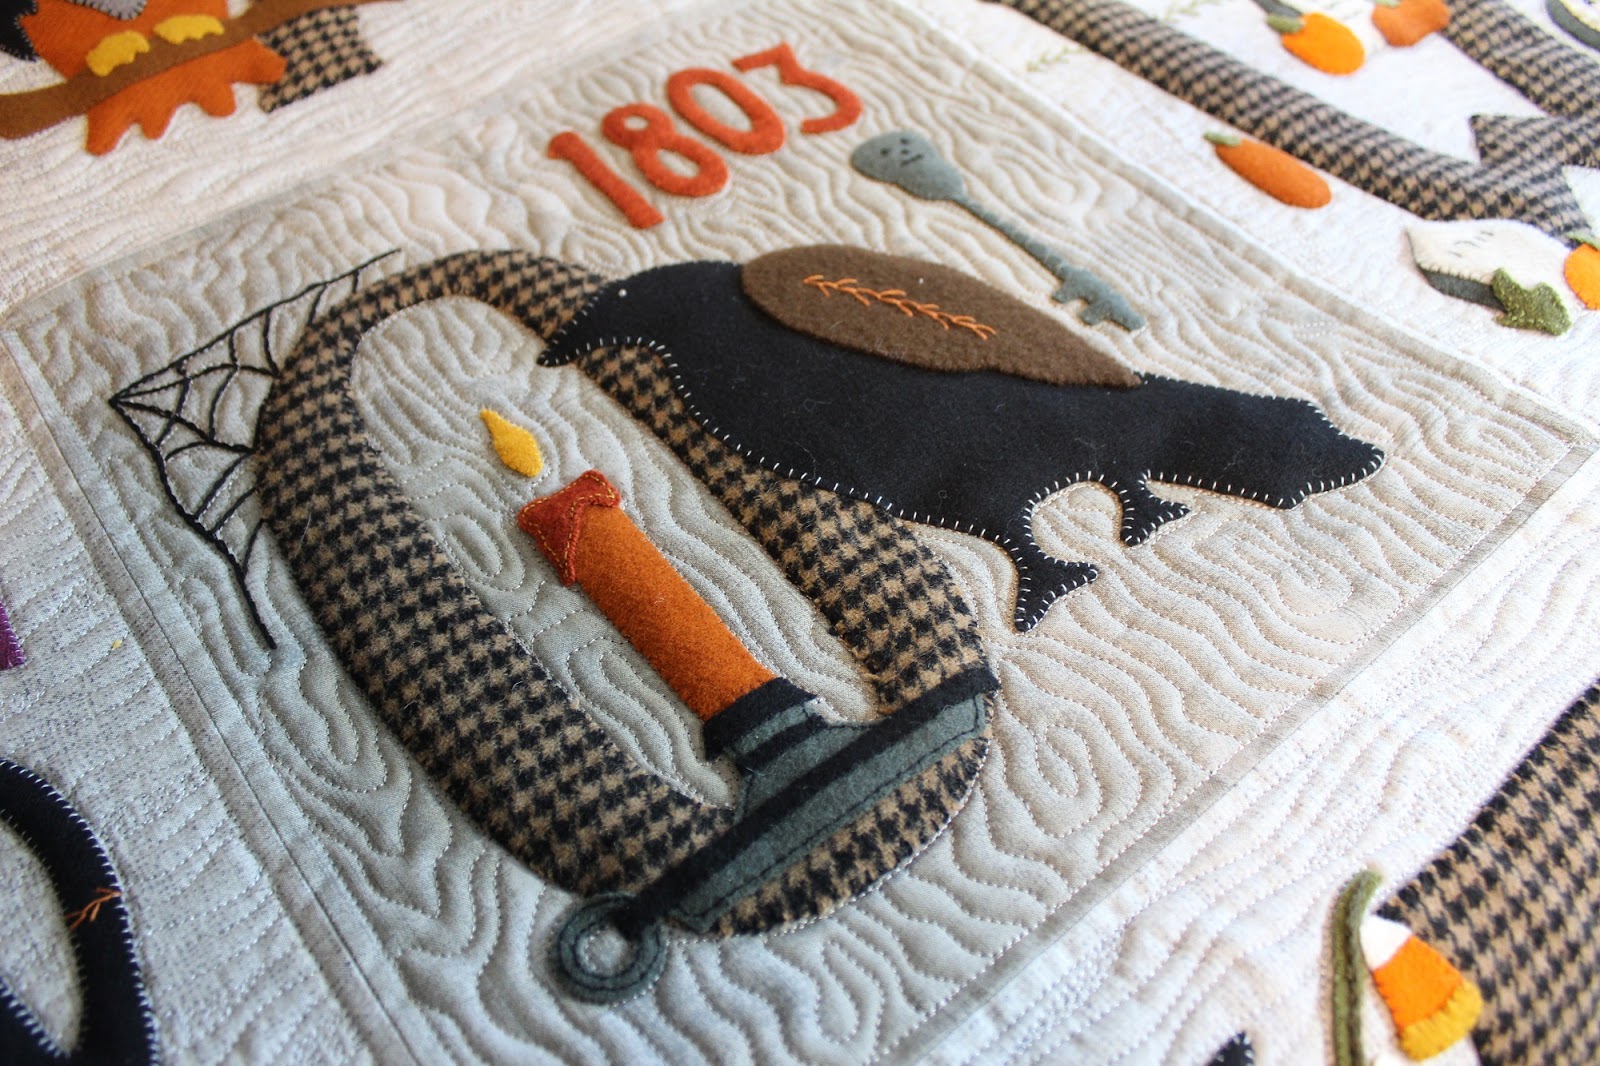
Some areas really take on the ram horns idea, while other areas are more linear. The backtracking decides where the next curl will start. Let's see this curly quilt fill stitched out.


The size of the curls can also change for different looks, like on Ladybug Dance.


varying curl sizes on Ladybug Dance by QuiltFabrication

or stay a consistent size as in the background fill in Chocolate Dipped Strawberries.

consistent size curly fill on Chocolate Dipped Strawberries

It's totally up to the quilter and the quilt as to which one works better. Either way, that curly fill will be sweet, adorable, cute, charming, delightful, or downright lovely - you choose how to best describe it!

Happy Quilting!


Thank you for following!
Follow on Bloglovin

Friday, January 3, 2020

January 2020 Book of the Month

It's been a while for a new Book of the Month, but I'm starting the year off right with another featuring quilting designs. Thanks to C&T Publishing, the honor goes to Straight Line Quilting Designs (affiliate link),


Straight Line Quilting Designs book

with contributions from numerous well known quilters - Natalia Bonner, Charlotte Warr Andersen, and Angela Walters, just to name a few.

A couple reasons why I chose the Straight Line Quilting Designs (affiliate link) book:

1) Everyone should have as many quilting resources available to them as possible, and Straight Line Quilting Designs (affiliate link) book is another tool to add to the library. I really think that the quilting part of this fabulous hobby of ours is probably the most frustrating, not only in trying to figure out what to quilt, but how to quilt a design that doesn't require major wrestling. And this book helps with both of those.

2) I love straight lines, and find them the easiest to stitch, either with a walking foot, or freemotion by following a guide (tape, ruler, water soluble mark, etc). There are unlimited possibilities in designs - check out a sampling from the book.


straight line quilting designs

Some look pretty complex, but upon close inspection, the design is made by repeating the same line horizontally and vertically - sneaky!


straight line quilting designs

Other designs require backtracking, or stops and starts, but they are so worth it for the texture they give to the quilt.

Besides all the 75+ designs to choose from, the Straight Line Quilting Designs (affiliate link) book features the design on two pages, and is spiral bound so the book lays flat. That way, the design is represented in a more-to-scale version, making it easier to both envision the design on a quilt, and to track the quilting direction

One note about the quilting direction: the Straight Line Quilting Designs (affiliate link) book does not provide any instruction on stitching the design. No 1-t0-2-t0-3 dots, no color highlighted lines, no 'start here'. It's completely up to the quilter to figure out the stitching sequence, which is pretty easy for a majority of the designs. As a seasoned quilter, I don't have a problem with that, though a beginner might. But once a quilter plays with straight lines, the possibilities are endless!

As for me, I'm looking to do some straight line quilting this month, and happy to add the Straight Lines Quilting Designs (affiliate link) book to my growing list of quilting design book titles!

Happy Quilting!


Follow on Bloglovin
Thanks for following!

Friday, November 1, 2019

November 2019 Book of the Month

Though I enjoyed last month's book feature, it's time to move on to a new selection. Continuing with quilting ideas for finishing quilts, how about the Rulerwork Quilting Idea Book (affiliate link) by Amanda Murphy?


I'm a big fan of ruler quilting, because for me, it adds order to a quilt design, and it's easy to execute. Plus, it's perfect for a quilt that needs that special quilting design to really enhance the quilt top.


This book is the second by Amanda Murphy that has a ton of ideas for quilting designs. The first was the Free Motion Quilting Idea Book (affiliate link), another resource on my shelf.


Now to dream up a project to stitch some ruler designs on - we'll see what I come up with!

Happy Quilting!


Follow on Bloglovin

Tuesday, October 1, 2019

October 2019 Book of the Month

Here it is, October, and time to turn the page, literally, and move onto a new Book of the Month selection. This month's choice is Step-by-Step Texture Quilting (affiliate link) by Christina Cameli.


step by step texture quilting by Christina Cameli

Full of both freehand designs and those requiring a grid structure, this book has a bit of everything. I know I was happy to find it, as it provided some design ideas for a client's Halloween applique quilt. And ultimately, we chose two designs, Fog,


fog quilting motif

and Wood Grain.


wood grain quilting

Here's a sneak peek at some other quilting ideas from Step-by-Step Texture Quilting (affiliate link):

Topography, which I like very much,


Topography quilting

and the use of scale, which really makes an impact.


quilting scale

As for other ideas, well, you're just going to have to get the book - I know I'll be adding it to my bookshelf.

Update: here's sharing the quilting motifs on a client's quilt.


Fabulous, don't you think?

Happy Quilting!


Follow on Bloglovin

Monday, April 29, 2019

Dragon Fruit Quilt Fill

Today, it's all about the Dragon Fruit quilt fill.


Dragon Fruit quilt fill on the United runner by QuiltFabrication

Quilted on the United runner made for the Be A Diamond Blog Hop, it's a fill I created specifically for this runner. With all of the star prints, I wanted some kind of a star motif in the background. But drawing a star, and nesting them attractively in a small space was not an adventure I wanted to take on. Hmm, what else would look nice?

So, I got my handy piece of vinyl and my favorite Expo Vis-a Vis WET erase marker (affiliate link), and started drawing over the background space. I tried swirls and pebbles, swirls with feathers, right angled lines that crossed each other, triangles, and stars. Nothing felt right. 

Then I put the swirls together with straight line spikes - now the design is coming together. Add in some echoing around the spikes, and fill is born!


drawn out Dragon Fruit quilt fill

Below are the four steps on how to make one motif of the Dragon Fruit fill - it all starts with a curl, then back a bit to make a hook, add three triangle spikes, then echo back around those spikes.


the four steps drawn out to make the Dragon Fruit quilt fill

Below are three of these motifs put together. Starting with the 'in' arrow, each motif is drawn with a changing swirl direction, so as to move around and fill in the space.


 Dragon Fruit motif to make a quilt fill


Now that the basics of drawing the Dragon Fruit quilt fill are covered, here it is in action:


Keep in mind that I was quilting this fill to get it done, and not to focus on perfection. That's only necessary for show quilts. But there are a couple of things to notice when quilting:

1. Don't worry if the echo is narrower, shorter, or even a bit curved. Or sometimes it's only halfway or missing. It depends on the amount of space that the machine is in at that moment, and the area that the machine needs to travel to next.

2. Backtracking is your friend. Use it in the ditches to move from one area to the next, or use it over previous stitching if all of a sudden the design is boxed in with nowhere to go. The golden rule is to not have more than 3 layers of stitching. More than that, and the thread buildup is really noticeable.

3. Just let the quilting flow! Repeat this mantra - curl, hook, spike, spike, spike, echo. Repeat. After several repeats, the design will become second nature.

So why is this named after Dragon Fruit? Well, hubby went shopping with me, and discovered Dragon Fruit.


a pile of Dragon Fruit

Quite a beautiful pile, yes? Though we didn't buy one, their uniqueness stuck in my head.


Dragon Fruit

With this view from the bottom, I think the Dragon Fruit fill is aptly named, don't you think?


Dragon Fruit bottom

Go ahead and bookmark this page for that one day when Dragon Fruit happens to be the perfect fill for your project. Be sure to send me a picture when the quilting is done - I'd love to share it with everyone!

Happy Quilting!


Follow on Bloglovin

If you're already a follower - thank you!

Friday, February 15, 2019

Mediterranean Rose Update

Hooray! The Mediterranean Rose quilt is almost done!


Mediterranean Rose quilting by QuiltFabrication

And it's about time too.

I think I loaded this quilt onto the Innova frame Sunday, February 3, and finally started quilting it on Tuesday, February 12. Wow! Nine days of just sitting there. Seems like a long time to me, though I know others have longer records out there.

The important point is, I finally started, mainly because now I need the quilt frame! The Show Your Wings blog hop quilt is pushing this one along, moving it from the design wall and then on to the frame. And now the blog hop quilt needs quilting. If I had zipper leaders, no problem - could have just swapped them out. But no, which means the time finally arrived to quilt the Med Rose.

I will admit to dragging my feet on it because I wasn't sure what to put in the background. I wasn't keen on SID around all that applique. The compromise? A small stipple within 3/8" of the applique, then becoming a peacock feather fill.


background quilting of a small stipple and peacock feather fill

Hard to see huh? Yep, a lot of work for quilting that just disappears - gotta love quilting on black. Well, at least if it does get noticed, it's pretty.

Yesterday, I set in finishing up the white areas with freehand SID around the applique (black arrows in the photo), 


freehand stitch in the ditch quilting

then a bit of straight line stitching (upper left of the photo below). The final touch will be to add some detail in the applique.


straight line stitching in the white background


Oh - here's a few hints for freehand SID around applique:
go at a slow, consistent stitch pace, and look ahead of the needle. Don't look at the where the needle currently is - look at where it needs to go. It's just like driving a car - you look where your going, not directly at the road in front of you.

That's your little nugget of quilting advice for today - have a great weekend quilting!


Follow on Bloglovin

Monday, July 2, 2018

Echoed Triangle Quilt Fill

Did everyone see the new pretty echoed triangle fill around the stars of the Salute runner?


Echoed Triangle Fill by QuiltFabrication

Isn't that gorgeous? Though this was quilted using a longarm machine, it can easily be stitched on a domestic machine.

There's two tricks to make this fill successful.

  • Only echo the triangle once.
  • Vary the direction of each triangle, not only in it's angle, but the rotation within the triangle. 


Let's look at the following drawings, which start with an open triangle that's echoed once.

first echoed triangle in the fill


Then a new triangle shoots off at a different angle, and a different rotation.

second echoed triangle with a different rotation direction


Here's the important part: to get where you want to go with this design, remember that the side the triangle starts on is the side the echo will end on.

where triangles stop and start in relation to rotation

If I had drawn that second triangle in reverse rotation, I would have ended up near the 'S' of start.

Then more triangles are added and echoed.

more echoed triangles

Sometimes, there may be areas that are a bit too thick. 

thick area to be filled

Just try to fill it in as best as possible.

large area filled

When the design fills the area, it will be hard to notice those funny spots. This one has another, but it's not glaringly obvious.

larger echoed triangle fill

Here's a video to see the design being stitched. It may be a bit hard to see because of the blue thread on a blue background, but now that you've seen it drawn, you should be able to follow along. And be sure to watch to the end, as I traced over the design so you can really see it.


I also suggest that before you sit down to stitch this fill that you practice drawing it on paper or a whiteboard first. Of course, practice before stitching any fill is highly recommended - it helps to set muscle memory, and trains your brain to stitch the design. And if you remember the tricks of the echoed triangle fill, it will turn out fabulous!

Enjoy your day quilting!


 Follow on Bloglovin