I'm back again with a tutorial on how I put together the latest Block Base+ Sew Along block, 1638, also known as Jacknife.
The folks over at EQ did a great job highlighting features of Block Base+ using block 1638. The post goes over different ways to search for this block in Block Base+ (no affiliation), and printing foundation paper templates, including the numbering and moving of parts for printing. This post is a good one for learning how to use the foundation or paper piecing printing features.
With this block, there's a choice to stitch it using either foundation piecing or templates. Ah, but there's another way! Using the templates as a guide, it can easily be sewn using squares and the stitch-n-flip method.
For reference, here's the block with labeled parts.
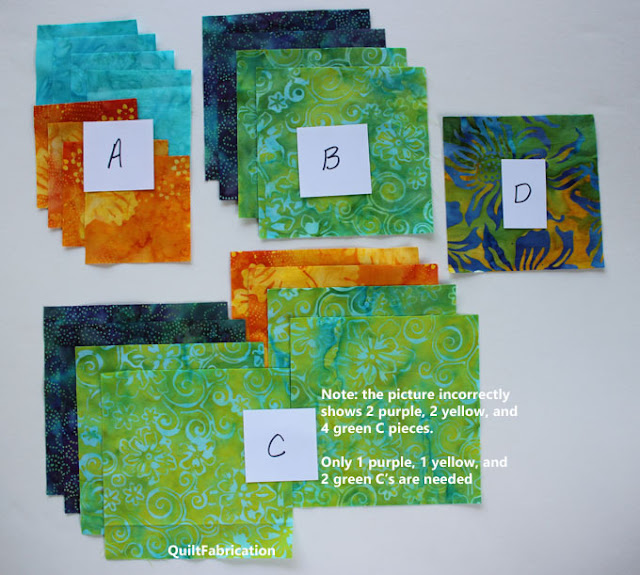
To eliminate confusion in the pictures, I'll use my block color scheme of teal and yellow (A's), purple and green (B's), yellow and green (C's), and the blue/green/yellow center, (D).
Jacknife block or block 1638
Materials for a 12" finished block
- A -- 4 (four) EACH teal and yellow 3 3/8" x 3 3/8" squares
- B -- 2 (two) EACH purple and green 4 7/8" x 4 7/8" squares
- C -- 1 (one) EACH purple and yellow 5 1/4" x 5 1/4" squares, 2 (two) green 5 1/4" x 5 1/4" squares
- D -- 1 (one) 4 1/2" x 4 1/2" square
Please note: the picture shows more C squares than needed - my oops!
Make A/B corner units
Draw a diagonal line on all A 3 3/8" squares.
Cut all B 4 7/8" squares on the diagonal.
Pair the yellow A squares with the green B triangles, at the 90 degree corner.
Do the same with the teal A squares and purple B triangles.
Stitch ON THE LINE. Trim the excess and press. The arrows below show the progression of each step for the two color pairs.
Pair each yellow/green unit with a purple/teal unit. Stitch together on the diagonal edge to make 4 (four) striped squares. Press seams open.
Trim the resulting A/B units to 4 1/2" x 4 1/2".
Make the basic fourX C units
Draw diagonal lines on both green 5 1/4" squares. Pair purple with green, and yellow with green. Stitch a scant 1/4" on either side of the line. Press to one side. Cut on the line for a total of 4 (four) HST's. Again, follow the arrows in the photo below for each color pairing.
Draw a diagonal line on both yellow/green HST's, perpendicular to the seam.
Pair each with a purple/green HST, making sure the green is on each side of the seam.
Stitch a scant 1/4" seam allowance on each side of the drawn line. Cut on the line, press seam open.
The result is 4 (four) basic fourX C units. Trim each to 4 1/2" x 4 1/2".
Assemble the Jacknife block (1638)
Lay out all units to make the block.
Chain stitch the first two units of each row together. Chain stitch the third unit to each row. Press the seams, alternating the direction from row to row for nesting the rows together.
Matching and nesting seams, stitch the rows together. Press seams to one side or open.
Ta-da! Wasn't that easy? And for fun, here's what a horizontal layout of 16 blocks would like, curtesy of Block Base+ (no affiliation).
I love that quilt layout feature - it's a great springboard for quilt designs!

My Favorite Patterns


Beautiful block!
ReplyDeleteLove this block, Susan! And the fabric!!
ReplyDeleteGreat tutorial and love the Jacknife block. Thank you for sharing.
ReplyDeleteAnother enthusiastic EQ user here. Although I opted not to purchase Block Base. Now I see you having so much fun, I'm tempted. I do the tutorials as well, in order to keep comfortable with EQ8's commands and features.
ReplyDeleteOh now this is an interesting block - and I like how you pieced it the *radiational * way... as in " I get that!!" Very nice!!
ReplyDeleteLove your colors Susan!
ReplyDeleteBeautiful block and thank you so much for the tutorial, Susan.
ReplyDeleteVery clever reworking of this block. I am not fond of paper piecing and much prefer regular construction methods. Thanks for sharing.
ReplyDeleteBeautiful block, thanks for the tutorial ;)
ReplyDeletePretty block, thanks for the tutorial, Susan.
ReplyDeleteGreat tutorial Susan. It almost tempts me enough to get Block Base! 😉
ReplyDeleteWhat a great tutorial, and I love the fabrics you used in your block.
ReplyDelete